Now Available, The SafeMezz360 Mezzanine Safety Gate

closed SafeMezz360 mezzanine safety gate

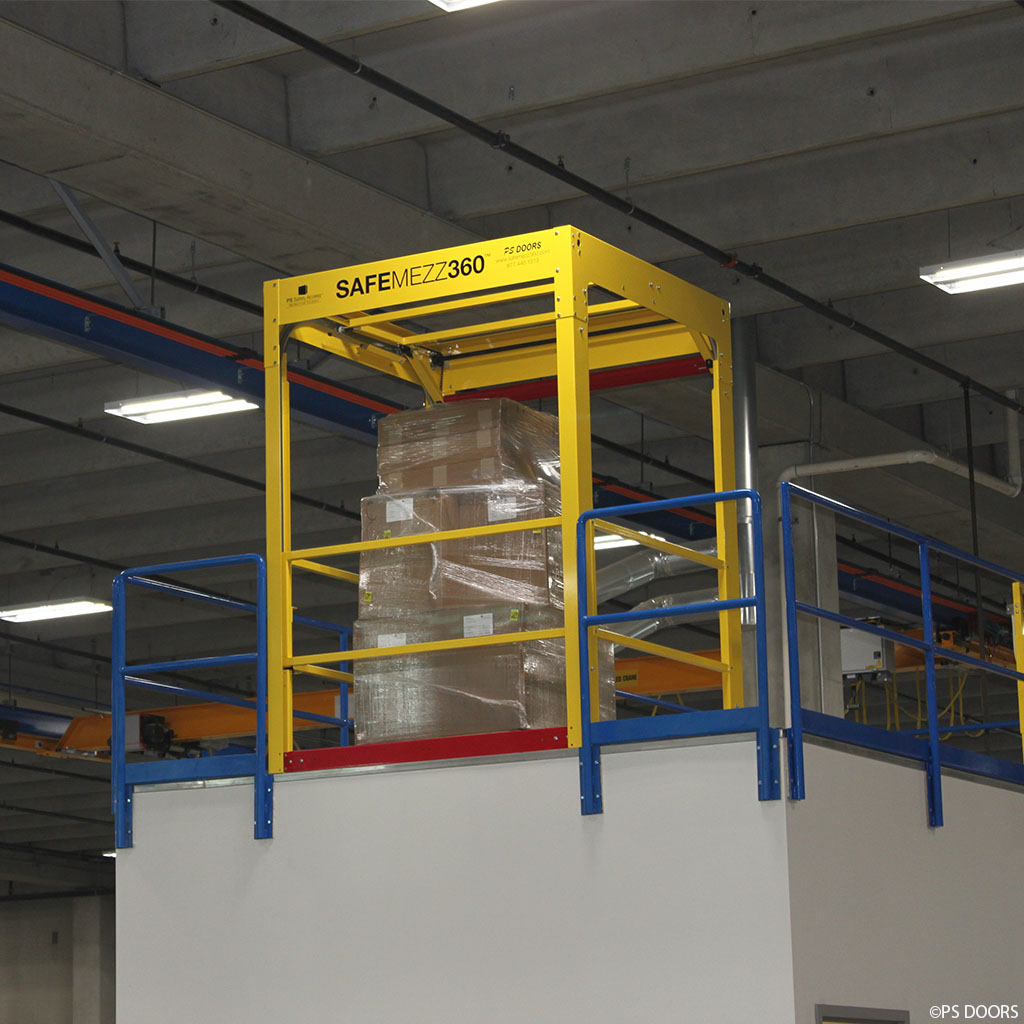
The new SafeMezz360 mezzanine safety gate

It’s an exciting time over in our mezzanine gate division.  Over the next year we will be introducing several new gates to our product line.  Today, I have the pleasure of introducing the first new gate to our regular product line up; the SafeMezz 360 mezzanine safety gate.

Open mezzanine safety gate

The SafeMezz360 mezzanine safety gate open to the edge.

Lately many facilities are opting to follow the voluntary ANSI standards in their workplace.   One area in which ANSI goes above and beyond OSHA would be ANSI MH28.3 Section 6.4.3 requirement that states: “A work platform shall be designed such that the elevated surface is protected by the guards at all times. Gates that swing open, slide open or lift out, leaving an unprotected opening in the guarding, are not acceptable.”   This means that at facilities following the ANSI standards, all pallet openings need to be protected by a true double layered safety gate so that your employees always have a line of guard rail between them and the edge of your deck.

In order to meet these more stringent ANSI requirements, the SafeMezz360 gate utilizes two counter balanced gates which travel on a track up and over your pallets.  Each gate consists of the ANSI required 42” top rail, 21” mid rail, and 4” kick plate. Designed for repetitive use in tough work environments, the SafeMezz 360 is constructed from heavy gauge steel with a durable safety yellow powder coat finish and utilizes an industrial duty chain and sprocket operating system.  The SafeMezz 360 mezzanine safety gate also features a slam proof cushioned dampening system to keep the gate from dropping on your toes.

The SafeMezz 360 is easy to install and operate.  The gates travel smoothly on 2” nylon rollers along it’s track system providing for an easy one-handed operation.  The gate ships in knocked down form for a simple assembly in the field, and bolts easily into place on the mezzanine.

In order to minimize the lead times, we have single and double wide openings available as “quick ship” mezzanine safety gates.  This means that many of the components will be prefabricated and stocked at the factory so that your gate should be ready to ship out in 1-2 weeks. Custom sized safety gates will still be available, but will need to go through full production (typically around 6 seeks after signed approval drawings).

Replace stairs in tight fit locations and meet code

Many locations have old stairs that need to fixed or replaced due to age, damage etc. Generally speaking regardless of the code in place when the original stair was made, you will need to update your stair to the current building code (IBC) when you replace stairs.

OSHA staircase, replace stairs

Stair meeting OSHA standards

3404.1 General. Except as provided by Section 3401.4 or this section, alterations to any building or structure shall comply with the requirements of the code for new construction. Alterations shall be such that the existing building or structure is no less complying with the provisions of this code than the existing building or structure was prior to the alteration.

This becomes an issue when stairs are installed in tight locations under codes that vary greatly from today’s current International Building Code (IBC) variants.

Imagine having a 12’ high stair in place with a riser height of 9” and a tread depth of 9”. This stair would have (16) treads, 9”deep for a total run of 11’3”.

If the replacement stairs would be required to meet IBC code (adopted by all of the states) they would now need to have (20) treads, 11” deep for a total run of 18’4”. The IBC stairs would extend 7’1” further than the originally installed stairs.

The increased run and decreased slope can wreak havoc on your facilities if the original stairs stopped right before a hallway (new stairs would extend well into the hallway) or if the stairs are enclosed (new slope would cause head clearance issues with existing structure).

If the above situation applies to you don’t sweat it. The above referenced IBC code section does have an exception that may help

Exceptions:

  1. An existing stairway shall not be required to comply with the requirements of Section 1009 where the existing space and construction does not allow a reduction in pitch or slope.
  2. Handrails otherwise required to comply with Section 1009.12 shall not be required to comply with the requirements of Section 1012.6 regarding full extension of the handrails where such extensions would be hazardous due to plan configuration.


Why the exemption for stairs (and possibly ramps, though not specifically called out)? The thinking behind the exemption is that without it, stairs that need to be replaced and are not safe will be neglected and not maintained due to the inability to bring them up to current codes. It is better to have a well maintained stair meeting an earlier code than have a poorly maintained stair that doesn’t meet current codes.

Removable Access Panel in a Modular Building Equipment Enclosure

cmm room equipment enclosure

New CMM room with removable panel above the door

A very common application for modular buildings is as an equipment enclosure.  The customer is trying to cordon off an area on their production floor to encapsulate a certain process.   Sometimes they are trying to isolate the sound it produces.  Sometimes they are trying to isolate it from a dusty environment.  A lot of these machines, such as CMM machines, won’t fit through a 6’8” or 7’ high doorway.  Once the equipment is in place it usually stays there for many years, but customers often want the ability to get it in and out of the room on rare occasions should the need arise without having to disassemble a good chunk of the building.  For a doorway that will only be used once in a blue moon, it’s rarely cost effective to order a custom swing door, or put in an additional canister style door for equipment access.  A much more cost effective method that we’ve found is to put in a removable access panel.

Removable panel on a modular building

Removable panel above a 6′ x 8′ doorway

Recently, we provided a customer with a modular building to use as an equipment enclosure for their new CMM equipment.  On a day to day basis, a 6’ wide x 6’8” high double door would be more than sufficient for them, but they wanted to be able to occasionally pass something larger through the doorway.   If they were going to pass taller materials through the door way more regularly we could have ordered in a special 8’ high double door, but because they only needed once in a blue moon access we were able save them several hundred dollars in material by putting in a removable panel section above their doorway.  

removable panel drawing

Adding a removable panel is a fairly simple thing to do.  The panels were cut in the factory to accommodate a 6’ wide x 8’ high opening.  We took an additional panel section to cover the gap above the 6’ x 6’8” door and framed it in using the channel for the door frame and some additional “h” cap trim pieces we normally use along the top of the panels.  We also installed “h” cap to the building panels at the opening above the door and fastened the removable panel to the opening.  This sealed off the seams between the panels.  Now when the customer needs that little bit of extra space, all they need to do is remove the screws connecting the panel to the building, allowing them to fit their larger equipment through.


Visiting an Old Mezzanine Supported Modular Office

mezzainine supported modular office from 1997

After almost 20 years of service this modular office is holding up great

Occasionally, I’m asked about how well our modular offices hold up over the years if they are designed so that they can be reconfigured in the future as your needs change.  Surely, after general wear and tear they will want to just order a new building anyway, no?   Well, I recently had the opportunity to visit an old customer of ours.  Over the years, we’ve provided them with a number of mezzanines, catwalks, and modular offices.  Several of the modular offices have been disassembled, modified, and reinstalled in different locations.  While there, I got an opportunity to look at this old tank platform mezzanine and A-wall 300 modular office we provided them with back in 1997.  The steel decking has started to bend up a little at the seam in a couple areas, but after almost twenty years of service the mezzanine and modular office were in excellent condition.  If the customer wanted to, it would still be a simple task to disassemble the modular office and put it up again in a new location, possibly with a few modifications.  The components are all still compatible with what we provide today.  The only design change is that the I-splines used to connect the panels in the A-wall 300 modular building system are now typically painted to match the panels as opposed to the same color as the framing on the windows and doors.  So yes, these modular buildings are built to last.


Steel Fixed Ladder Handrail Options

Does my ladder need a handrail?

Almost all ladders will have an extension at the top, with the only exceptions being ladders accessing roof hatches, manholes, floor doors, or anything else that closes over the top of the ladder. If you are exiting the ladder to the side or going to an offset platform due to the 30’ maximum climbing distance between ladders, you will need to add four more rungs above the platform. Those rungs are only to be used for hand-hold only, to give you something to grab onto to safely exit the ladder.


Side step ladder platform for climbs over 30' in length

Side step ladder platform for climbs over 30′ in length

If the ladder is going up to a wall, to a roof, or to a mezzanine, then you will need extensions on the ladder for the “walk-through” exit of the ladder.

We have three different designs of walk-through handrails and I’ll go into the details on each of them below.

Steel ladder handrail options

Steel ladder handrail options

The first design, the “8” shape, is our standard ladder design. This is the most commonly used handrail setup as it allows for the top of the walk-through to mount to the landing surface, providing the greatest rigidity at the handrail. It also makes installation easy, as there are no questions where the top rung mounts; it is always installed properly meeting the top of the landing surface as required by code.

In cases of short parapets or locations where you cannot have the walk-through handrail anchor to or even set upon the roof you would use the second “P” profile, our “self supported walk-through handrail”. This handrail design works well when there is a parapet under 14” high that the handrail mounting pads would not line up with. It is not a necessity to use the “P” shaped handrail in those instances. Many installers still prefer the “8” layout for the added cross brace back to the ladder. When installing a ladder with our self-supported walk-through handrail, be sure to install properly, with the top rung level with the top of your roof. There is no foot pad at the top to ensure this is done, so installation just requires a check to be sure of compliance.

The last ladder handrail design is our “customer supplied walk-through handrail”. This is used in instances where the installation location has existing railing and handrails that they want to weld the walk-through handrail to. This is useful in locations where space is minimal and existing site conditions allow for field welding to existing rails.

Not shown is our step across platform, which is essentially a crossover used when site conditions require the ladder rung to be more than 12” away from the landing surface as required by OSHA standards. Most commonly, this is used on locations with gutters that are more than 5” off the face of the climbing side of the wall.

OSHA 1910.27(d)(3)

“Ladder extensions.” The side rails of through or side-step ladder extensions shall extend 3 1/2 feet above parapets and landings. For through ladder extensions, the rungs shall be omitted from the extension and shall have not less than 18 nor more than 24 inches clearance between rails. For side-step or offset fixed ladder sections, at landings, the side rails and rungs shall be carried to the next regular rung beyond or above the 3 1/2 feet minimum (fig. D-10).

Putting a Window and a Through the Wall Air Conditioner in the Same Panel of a Modular Building

Non progressive modular building system with a through the wall HVAC

The existing modular building with a through the wall HVAC, before modifications.


Modular building systems are designed to be relatively easy to modify should the need arise.  This past summer we put in this 10′ by 11′ odd shaped modular building to serve as a control booth at a steel plant here in Ohio.  All the panels had a window in them, aside from a small panel on the end which held a through the wall heat/cool air conditioner. After everything was installed, the workers who operate the control booth determined that they wanted to add a window to that panel as well, and move the air conditioner above the window.  Unfortunately, modular wall panels are not generally designed to support a through the wall air conditioner when placed above a window.   We could, however, modify it to put the air conditioner below the window.

non progressive modular wall system dissassembly

Removing the modular building wall panel to make the modifications

Depending on the modular building system used, there are a couple of different ways to go about making the modifications.  In this particular case, with it being a non-progressive modular building system with steel skinned panels, we reused the existing materials, and made the modification directly to the panel.  We shipped the customer a new custom width window to fit inside the narrow panel, and some new trim for the framed HVAC opening as the customer decided to put in a heavier duty air conditioner while we were doing the modifications.  All the other components were reused from the existing.

Modular wall system with window and HVAC in the same panel

After the modifications the wall panel now has a new window and HVAC below


The modifications were fairly quick and easy.  When the installers arrived, they disassembled that section of the building to remove the panel in question.  They then cut the modular building panel to fit the new window and air conditioner.  Afterwards, it was simply a case of putting it back together.  All said and done, it took two guys about half a day to complete the modifications.


Minimizing the Thickness of a Mezzanine Deck

W16x31 primary framing member with 4”x14” long tab side mounted to the column

A mezzanine deck thickness between the bottom of the primary framing member and the top of deck.


There are many times when the thickness of a mezzanine needs to be minimized due to various height restrictions.  The tightest we could normally provide a storage mezzanine would be one foot between the clearance height underneath and the top of deck.  In order to do this though, there are several things we need to consider.

First, we need to consider where the mezzanine is going.  Mezzanines in highly seismic regions, such as the Pacific coast, typically require larger and heavier beams than those installed in regions with minimal seismic activity, such as here in northeastern Ohio.  This doesn’t necessarily mean that we won’t be able to get the deck thickness down to a foot, but it does make it more difficult.

Next, we’ll want to look at our general design and column layout.  The positioning of the columns can greatly affect the size of the beams required and, in turn, the thickness of the mezzanine.  What are the required column spans for the project?  Typically we like to keep our column spans under 20 feet on center for economic concerns.  Longer spans require bigger beams.  Often if we’re trying to minimize the deck thickness we might need to go with even shorter spans.  We’ll also want to avoid a cantilevered deck if possible, as that too can require a larger beam than normal.

Another thing to consider is bracing on the deck.  Generally we have a moment connection between the columns and our framing members by trimming back the wide flange I-beam and bolting it directly to the side of the column without requiring knee bracing.  While trying to minimize the thickness of the mezzanine, we might ask you if we can use “tabs”.  These are typically 14” long by 4” high pieces of angle that we attach below the primary framing members at the columns.  This is particularly important when trying to keep the thickness of the mezzanine to just a foot, as there just isn’t enough beam to make a good solid connection.  We might be able to provide a mezzanine with 7’ clear and an 8’ top of deck, but at the columns above the baseplates you’ll have a piece of angle coming 4” off of that 7’.

The final thing to consider is price.  Minimizing the thickness of the mezzanine will increase the price.  The beams might be smaller, but they are heavier.  We might need to use more columns than usual.  We might have to replace all “C” section secondary framing members with structural steel beams.  All this extra steel adds to the cost.  On average, most of the mezzanines we provide have a deck thickness of 1’3” or 1’5”.  If the extra couple inches are critical then by all means go for it, but if not, it is usually not worth the added cost.

Stair tread adhesives

By Jared @ Floormatstore.com

Winter is coming… and it’s time to shift from tackling outdoor projects to indoor ones. At the floormat-store.com division, that tends to mean a spike in stair tread inquiries. Installing indoor rubber and vinyl stair treads is a great cold weather project. What most customers forget to consider when attempting a stair tread project when it gets cold though, is the adhesive.


Rubber and vinyl flooring adhesives have minimum temperatures usually around 65°F. If the temperature of the room you’re installing in isn’t at or above the minimum, you’ll be waiting a long time for the adhesive to set. Every year, we get a few customers calling with the complaint that the adhesive they received was a bad batch. So far, every time, it wasn’t the adhesive’s fault. The installer failed to read the instructions thoroughly enough to catch that temperature warning. Usually, it’s an unfinished basement or the few steps that lead from the garage to the house, but with the kids out of school over Thanksgiving and winter break, cold stair wells in schools are a common application, too. Most adhesives also need around 24 hours to set in ideal situations, so leave that heat on for a day (or two) after you finish.


Musson #300 water based contact adhesive

Musson #300 water based contact adhesive with 0 VOCs. Great for indoor stair tread installations

While keeping the temperature in mind, you’ll also want to consider that a lot of adhesive options require a well ventilated area. In summer that’s easy – just open some windows and doors and wear a mask. As it gets cold outside though, leaving those open isn’t an option. So make sure to get a low VOC adhesive that will work for the application. The last thing you want is to pass out from the fumes while installing stair treads – ouch! A water-based contact adhesive, like Musson’s #300, works for both rubber and vinyl treads, risers and tiles, going over concrete, wood, terrazzo, metal and marble – and typically have 0 VOCs. That safely covers just about any application.


Best of luck and stay safe with your projects.

-Jared @ www.floormatstore.com

Ladder Modification to Meet OSHA standards

control_tower_ladder
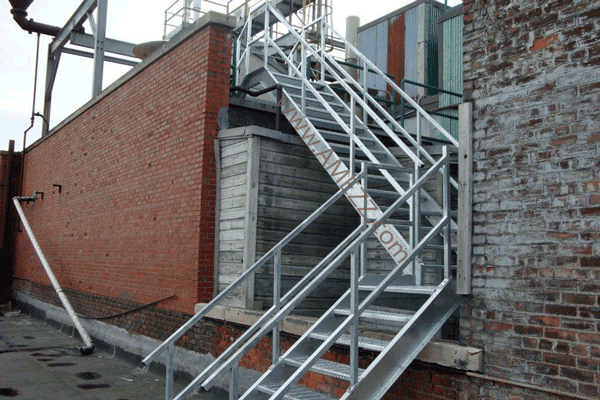
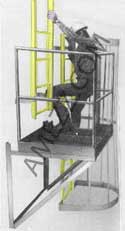
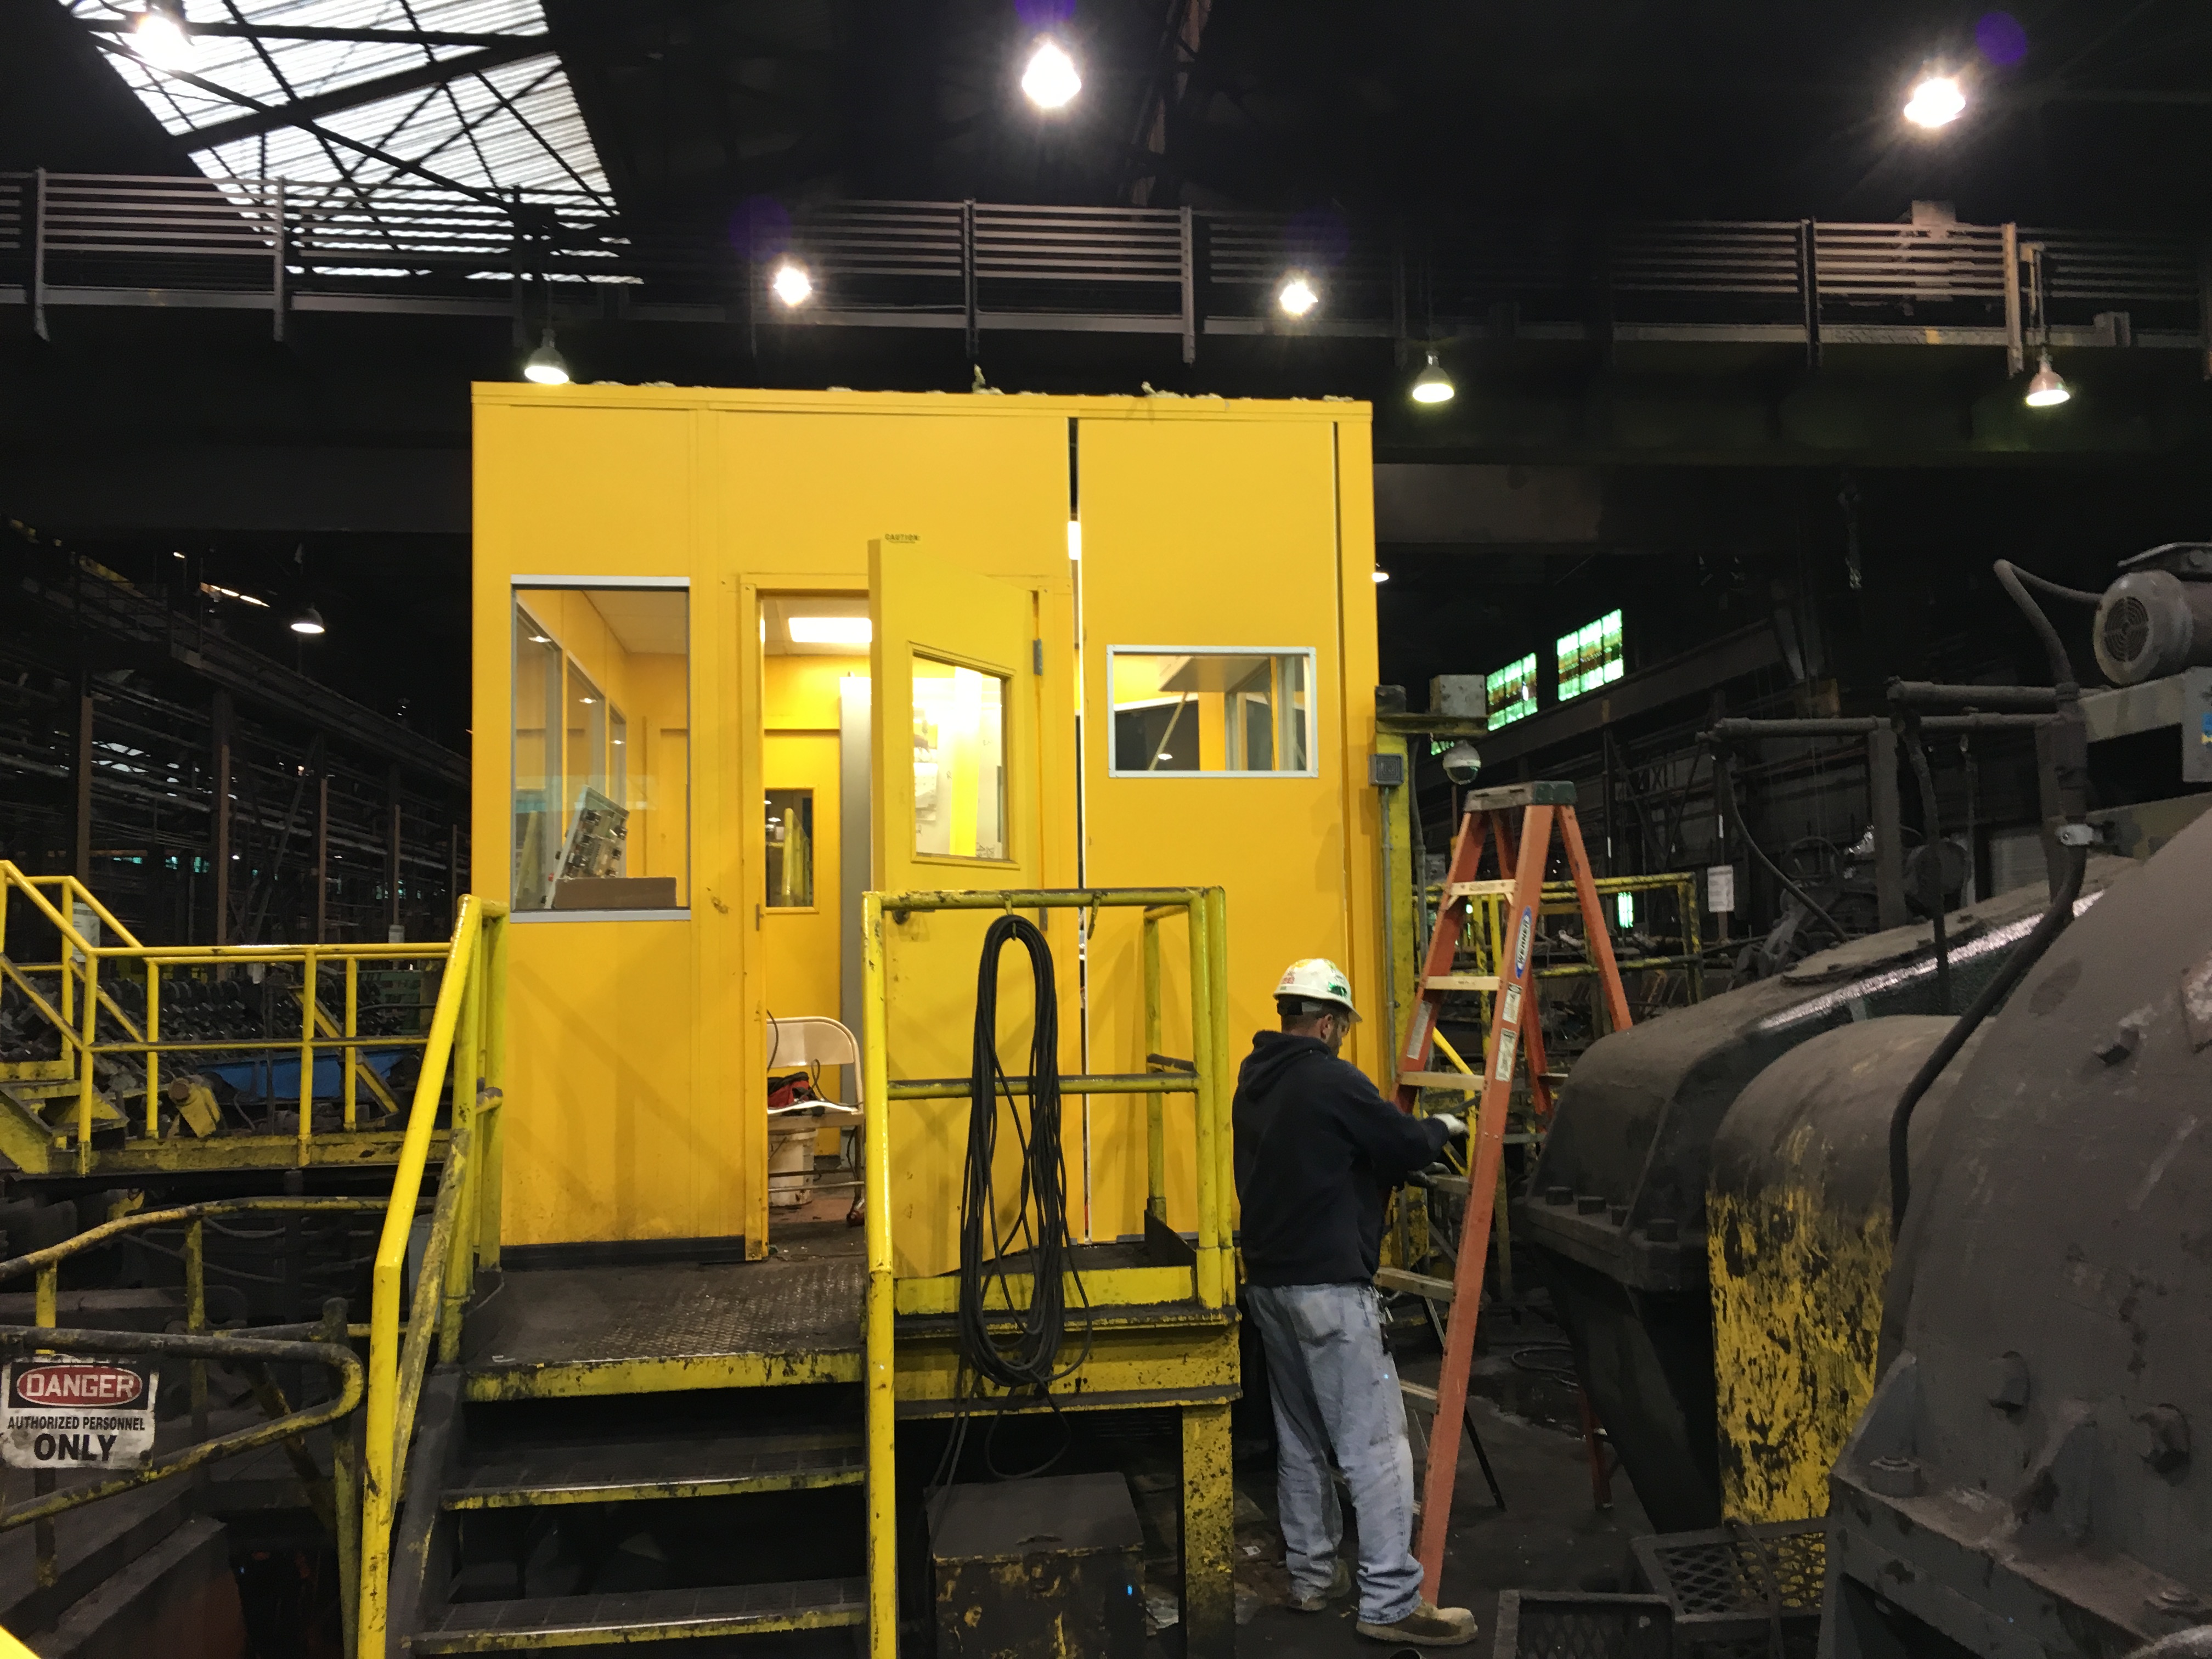
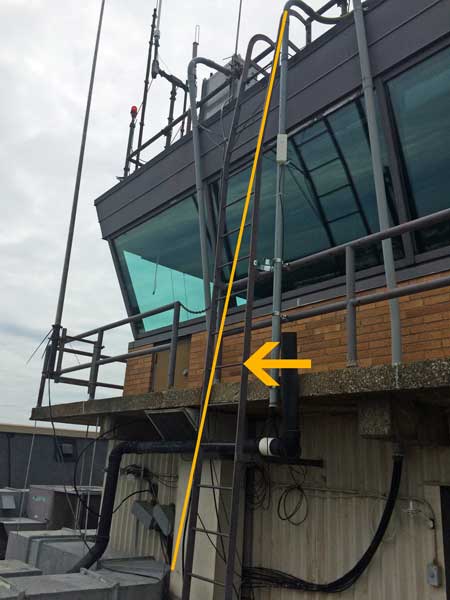
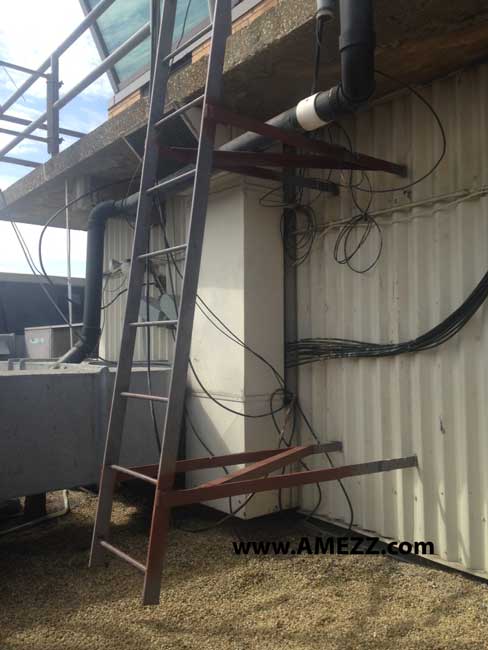
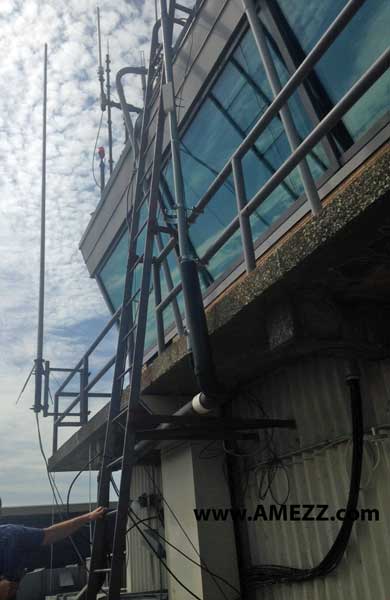
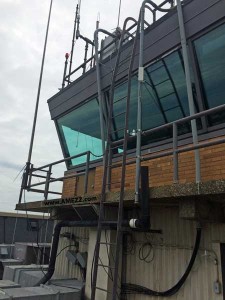
We recently were called out to look at a ladder that did not meet OSHA standards (1910.27) for clearance on the back side of the ladder. The ladder also had two angles of climb as shown in the above photo. When climbing up the ladder, the concrete walk was too close to the ladder for you to safely grasp the rung and also to put your foot on the rung while climbing. The ladder was accessing the top of the traffic control tower at an airport, and as such, we had to work around a variety of factors to ensure a proper replacement or modification of the ladder could take place without interrupting operations. As the install location was at an airport, the use of a crane to bring a replacement ladder to location would have been a logistical nightmare. We decided that whatever the solution was, it was to be brought up from the inside of the tower.

control_tower_ladder_option1Our first option was to remove the ladder and replace it with a 90 degree ladder. That is the most common fixed ladder type. There were, however, issues with supplying a replacement ladder.  First off, the concrete walk and rail were extended beyond the top of the tower. This meant that our replacement ladder would need to be very far from the structure in order to give us the required 7” clearance behind the ladder at the concrete walk location. That is not a deal breaker, but holding so far off the structure would have also required an extra-long crossover to reach the tower roof.  OSHA allows the ladder to have a maximum 12” step across at the top of the ladder. As the ladder has to stand 7” off of the wall (or the furthest obstruction off the wall) you can get by without a step across platform if the obstruction is 5” or under (5+7=12). The replacement ladder would have been very large. Ordinarily, this too can be dealt with by using our modular line. Our Modular Fixed Ladders come in pieces no larger than 7’L. Each ladder section bolts to the next one and has a pair of standoff brackets before and after the splice.

We could not accommodate additional standoff brackets required by the modular design so we would have needed to weld each splice together. Again, this was not a deal breaker either, but it did make this option less economical than other options.

control_tower_ladder_option2We decided that it was more economical to modify the existing ladder. The top of the ladder was already angled at an 81 degree angle. In the field we ran a laser down the ladder from the top to see where we would land if we kept that same angle throughout the climbing run. By cutting the ladder at the bend, and then cutting each of the lower standoff brackets, we were able to gain close to a foot of clearance at the concrete landing, well within the acceptable tolerances of OSHA’s standards. This option was not without its challenges though. As the ladder was going to be sticking off the wall even further than before, we were concerned about having a stable climb.

Here is the original ladder with the standoff brackets back to the structure.

Here is the original ladder with the standoff brackets back to the structure.

control_tower_ladder_afterWe added cross bracing across the two standoff brackets to stiffen the ladder up with the extended bracket length. After modifying the ladder, the bottom rung was still within the 14” allowed by ANSI A14.3, so no additional ladder rungs were required. Each welded location was then sanded down to remove any sharp edges or burrs and painted with a rust inhibiting primer. The end user was going to have their maintenance department repaint the ladder after completion of the work to help cut down on costs.

The ladder modification was completed at budget and within the scheduled time. Most importantly, the customer now had safe access to their roof. If you have a unique situation like this, give us a call. We can help you come up with the solution that fits your site requirements and budget, too.

completed_control_tower_ladder

Using Modular Building Materials to Build a Control Room in a Steel Plant

Steel plant control room constructed of non-progressive modular building system

The shiny new control room made using modular building materials.

We recently received some photos back of a modular building we provided a customer that I thought would be nice to share with you.  The customer has a steel plant here in Ohio, and was looking to replace and expand upon an existing steel constructed control room pulpit on their mill floor.

Looking inside the odd shaped modular building control booth

The irregular shaped control panel dictated the pentagonal shape of the building.

The new control room was roughly 10’ long x 11’ wide x 9’ high, but due to the shape of one of their existing control panels, the room needed to be pentagonal with a diagonal wall.  The wall panels were made of 24 ga painted steel with a 3” thick polystyrene core.  The customer wanted the building to stand out and requested we paint everything safety yellow.

For this project we used a more traditional progressive building system where the wall panels were separated by wiring chases as opposed to our non-progressive A-wall system. While this system does not offer the uniform sound barrier that the A-wall system offers and has more pieces required to install, it did offer them some advantages.  Due to the overall design of this project, it was less expensive for the customer. If something were to happen to one of the panels that would require it to be replaced, they would not need to disassemble as much to replace it as the progressive system allows them to remove an individual panel without needing to start at the corner.  The customer also has several other control rooms in their facility of this same design.  They’re very pleased with them and wanted to maintain compatibility through their plant.

Exposed recessed beam in ceiling plenum of modular building control room

With the control room ready for electrical installation, you can clearly see the beam used in the ceiling plenum to provide the customer with a 25 PSF “walking load” for the roof deck.

Using a steel beam in the ceiling plenum, and some heavier gage reinforced wiring chases underneath, we were able to also provide the customer with a 25 PSF “walking load” capacity for their roof deck.  For one more special little touch, we were able to provide the customer with some cabinets that would fit above their windows to store their notebooks and such.

bright yellow steel mill control booth

The bright safety yellow control room really stands out.

Their existing control room was torn down on Saturday, and the new modular building was put up on Sunday, ready for their electricians to wire in the control panels.  The customer was really pleased with how quickly the transition went.