Tag Archives: maintenance

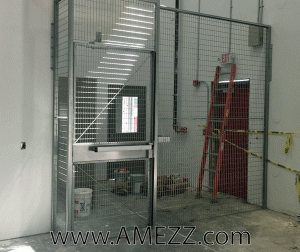
delivery driver entry cage

Let A-Mezz Help Tackle Maintenance Projects That Have Been On Hold

A-Mezz Industrial Structures, Inc.

With the challenges that COVID-19 has caused, many companies are experiencing unexpected and historic slow downs. While on shutdown, this is the perfect time to review your facility’s maintenance needs.

Do you have ladders that do not have the safety gates that are required by OSHA? Our MLG gates are versatile, durable, and economical. 

Does your facility need a lockable tool crib to prevent tools from walking off? Our welded wire partitions can provide limitless customizable options at an affordable price. 

delivery driver entry cage

Quarantined Delivery & Visitor Entry Cage

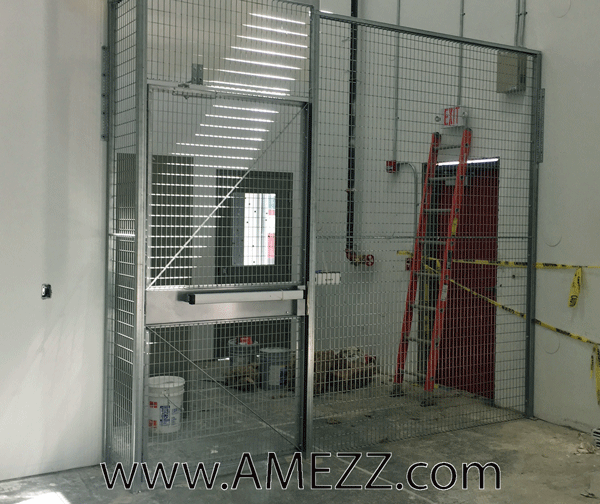
Do you have a quarantined area for delivery drivers to keep your facility secure from wanderers? A-Mezz can help with a wire partition equipped with pass-through service windows, hinged doors with push bars, and electric strikes for wiring to RFID card readers. 

Are your employees properly guarded from your machines? Are your machines properly guarded from mobile equipment? We have many options of machine guarding whether you need framed mesh panels, trimmable welded panels, or heavy duty guardrail in both single rail heights and double rail heights. Now is the time to not only protect your employees around your machines, but to also install proper guards to protect your machines from forklift trucks and other mobile machinery. 

These are difficult times for everyone, but let’s not waste the opportunity we’re given to finally tackle those maintenance issues that have been pushed off. A-Mezz is here to help ensure you get in a better position for success than where you were before COVID-19. 

Tool Cribs Cut Down Lost Time and Tools – A-Mezz

Do you want your workers to act and feel like professionals, or DIYers? Cut down lost time and tools with A-Mezz tool cribs.

A-Mezz can help you increase productivity and decrease waste with our lockable wire parts lockers and tool cribs. Made of high strength welded wire, our secure storage options will save you time and money and make your shop look more professional and clean.Photo of a missing part from a job

Why are lockable tool cribs important?

There is nothing worse than being in the middle of a project and realizing someone walked off with the tool or parts you need. While your productivity was at its peak, you had to stop what you were doing and locate the missing items. Lost items that aren’t quickly found need to get replaced, causing you to waste even more time – and money – going to the store or searching the web to source the replacements. If the replacement tools or parts are not readily available you then have to table the in-process project until the replacements come in, greatly increasing the chance for additional components to get misplaced.  

A lockable tool crib is a must to ensure your workers have what they need, when they need it. Expensive tools will stop going missing – either through misplacement or employee theft. You will spend less money replacing items, spend less time looking for items that “walk away”, and spend more time making money.

What options are available?

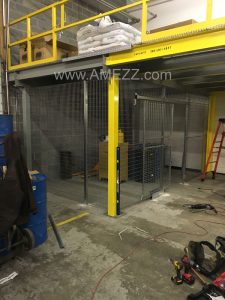
A-Mezz can help you configure a layout that works for you and your site. We can supply small multi-tiered lockers for parts and tools all the way up to large tool cribs. Pretty much anything is possible. There are available sliding doors, hinged doors, service windows, electronic keypad entry systems, keycard locking systems, padlock hasps and cylinder locks. If you have a special lock you prefer, such as one tied to a facial recognition system, we can supply an electric strike on the door to tie into your system.

Lockable tool crib located under elevated platform with sliding door access

Lockable tool crib located under elevated platform with sliding door access

My install location isn’t standard shaped/sized – can I still use a tool crib?

The great thing about tool cribs is that there are no rules. Size is whatever you need and they can go literally anywhere. We have installed lockable parts storage for maintenance and tool cribs above mezzanines, below mezzanines and out in the middle of shop floors.

Contact A-Mezz and let us help you increase productivity and increase your margins by decreasing waste and project hours.

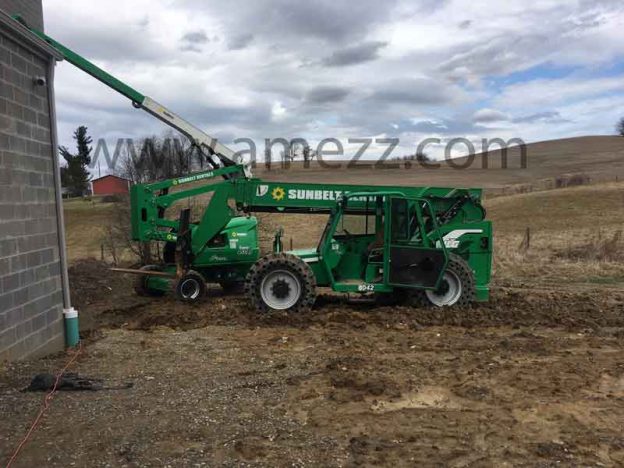
A-Mezz Ladder Install in Muddy Conditions

Springtime Muddy Ladder Installation

Ahh… Spring time in Ohio. The flowers, birds, oh and MUD.

A-Mezz Ladder Install in Muddy Conditions

A-Mezz Ladder Install in Muddy Conditions

We got a call from a builder with with a newly constructed structure – so new that there was no paved access yet – and they needed a ladder to gain access to their HVAC rooftop units. The building height was over 30’ and we had some options on how to access the roof based on OSHA’s new regulations.

The first option was a straight, uncaged ladder 35’ high with a personal fall protection cable. That is the new OSHA requirement on all climbs over 24’. The pros of the cable/track systems are that the climber wears a harness and clips onto the fall arrest system so that if he falls, the system stops his fall. The downside is those systems require the climber to have a harness and proper equipment to utilize the cable/track.

For this site the customer chose to go with the second option. We used a lower, uncaged ladder to get them up to a mid landing under 20’h. Then we used a second ladder with cage to climb from the intermediate landing to the upper roof. This setup was slightly more expensive up front but did not require the purchase of additional harnesses, trolleys and maintenance that the personal fall arrest systems required. Additionally, the cage is always there. This provides a safety benefit always, whereas the personal fall arrest systems only provide a safety benefit if the climber is wearing a harness and has the proper equipment. By utilizing the intermediate platform, no climb between platforms is over 24’ so the customer will not have to retrofit their ladders with personal fall arrest systems in 18 years when OSHA’s grandfather rules expire for existing ladder systems.

We had to hold off on install for a couple weeks as the ground thawed early in Ohio and there was way too much mud for our equipment to get to the install location. Luckily we caught a break and a few dry sunny days slightly helped dry out the site – being Ohio, if we didn’t get out to the site when we did, the spring rains could have pushed things off for months until things dried up.

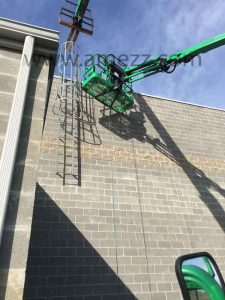
Trying not to bury our axels in the mud, we got the upper ladder into place and worked down from there.

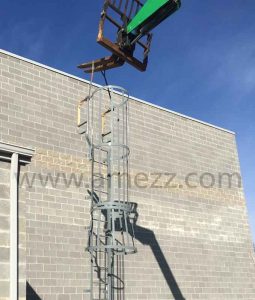
Upper Caged Ladder Being Lifted into Position

Upper Caged Ladder Being Lifted into Position

We fabricated the upper ladder with our self support walk-through handrail because the wall included a short parapet and we didn’t want to have the ladder setting on the metal capping.

Self supported walk-through handrail detail

Self supported walk-through handrail detail

On the lower ladder we included our lockable rung door so that unauthorized people could not climb the ladder.

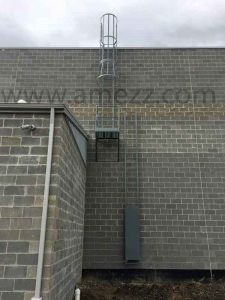
Completed Installation of Ladder System

Completed Installation of Ladder System

With a crew of two men and one morning, the ladder system was installed (despite the mud) and the customer has safe, OSHA and ANSI compliant access to their roof. A-Mezz took care of everything from design, detail, fabrication and installation and we were able to educate the customer on all of their options and costs. The project was done on time for the amount budgeted.

Stair tread adhesives

By Jared @ Floormatstore.com

Winter is coming… and it’s time to shift from tackling outdoor projects to indoor ones. At the floormat-store.com division, that tends to mean a spike in stair tread inquiries. Installing indoor rubber and vinyl stair treads is a great cold weather project. What most customers forget to consider when attempting a stair tread project when it gets cold though, is the adhesive.


Rubber and vinyl flooring adhesives have minimum temperatures usually around 65°F. If the temperature of the room you’re installing in isn’t at or above the minimum, you’ll be waiting a long time for the adhesive to set. Every year, we get a few customers calling with the complaint that the adhesive they received was a bad batch. So far, every time, it wasn’t the adhesive’s fault. The installer failed to read the instructions thoroughly enough to catch that temperature warning. Usually, it’s an unfinished basement or the few steps that lead from the garage to the house, but with the kids out of school over Thanksgiving and winter break, cold stair wells in schools are a common application, too. Most adhesives also need around 24 hours to set in ideal situations, so leave that heat on for a day (or two) after you finish.


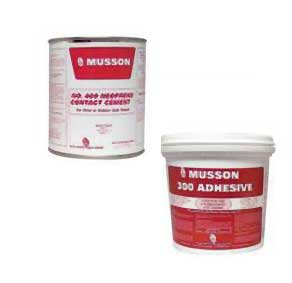
Musson #300 water based contact adhesive

Musson #300 water based contact adhesive with 0 VOCs. Great for indoor stair tread installations

While keeping the temperature in mind, you’ll also want to consider that a lot of adhesive options require a well ventilated area. In summer that’s easy – just open some windows and doors and wear a mask. As it gets cold outside though, leaving those open isn’t an option. So make sure to get a low VOC adhesive that will work for the application. The last thing you want is to pass out from the fumes while installing stair treads – ouch! A water-based contact adhesive, like Musson’s #300, works for both rubber and vinyl treads, risers and tiles, going over concrete, wood, terrazzo, metal and marble – and typically have 0 VOCs. That safely covers just about any application.


Best of luck and stay safe with your projects.

-Jared @ www.floormatstore.com

Ladder Modification to Meet OSHA standards

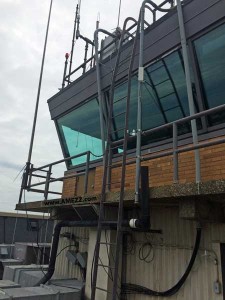
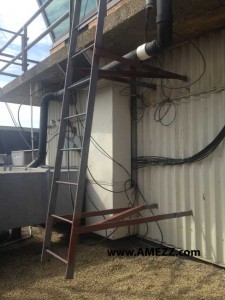
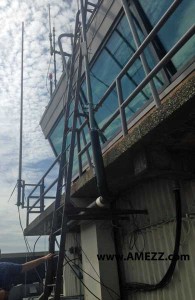
control_tower_ladderWe recently were called out to look at a ladder that did not meet OSHA standards (1910.27) for clearance on the back side of the ladder. The ladder also had two angles of climb as shown in the above photo. When climbing up the ladder, the concrete walk was too close to the ladder for you to safely grasp the rung and also to put your foot on the rung while climbing. The ladder was accessing the top of the traffic control tower at an airport, and as such, we had to work around a variety of factors to ensure a proper replacement or modification of the ladder could take place without interrupting operations. As the install location was at an airport, the use of a crane to bring a replacement ladder to location would have been a logistical nightmare. We decided that whatever the solution was, it was to be brought up from the inside of the tower.

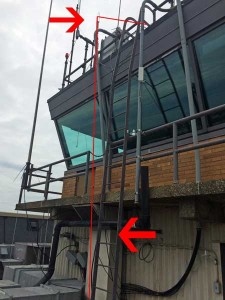
control_tower_ladder_option1Our first option was to remove the ladder and replace it with a 90 degree ladder. That is the most common fixed ladder type. There were, however, issues with supplying a replacement ladder.  First off, the concrete walk and rail were extended beyond the top of the tower. This meant that our replacement ladder would need to be very far from the structure in order to give us the required 7” clearance behind the ladder at the concrete walk location. That is not a deal breaker, but holding so far off the structure would have also required an extra-long crossover to reach the tower roof.  OSHA allows the ladder to have a maximum 12” step across at the top of the ladder. As the ladder has to stand 7” off of the wall (or the furthest obstruction off the wall) you can get by without a step across platform if the obstruction is 5” or under (5+7=12). The replacement ladder would have been very large. Ordinarily, this too can be dealt with by using our modular line. Our Modular Fixed Ladders come in pieces no larger than 7’L. Each ladder section bolts to the next one and has a pair of standoff brackets before and after the splice.

We could not accommodate additional standoff brackets required by the modular design so we would have needed to weld each splice together. Again, this was not a deal breaker either, but it did make this option less economical than other options.

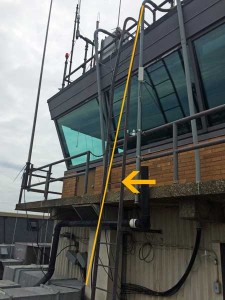
control_tower_ladder_option2We decided that it was more economical to modify the existing ladder. The top of the ladder was already angled at an 81 degree angle. In the field we ran a laser down the ladder from the top to see where we would land if we kept that same angle throughout the climbing run. By cutting the ladder at the bend, and then cutting each of the lower standoff brackets, we were able to gain close to a foot of clearance at the concrete landing, well within the acceptable tolerances of OSHA’s standards. This option was not without its challenges though. As the ladder was going to be sticking off the wall even further than before, we were concerned about having a stable climb.

Here is the original ladder with the standoff brackets back to the structure.

Here is the original ladder with the standoff brackets back to the structure.

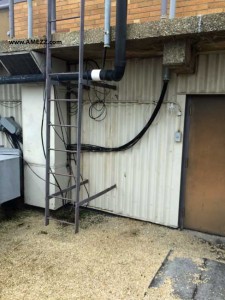
control_tower_ladder_afterWe added cross bracing across the two standoff brackets to stiffen the ladder up with the extended bracket length. After modifying the ladder, the bottom rung was still within the 14” allowed by ANSI A14.3, so no additional ladder rungs were required. Each welded location was then sanded down to remove any sharp edges or burrs and painted with a rust inhibiting primer. The end user was going to have their maintenance department repaint the ladder after completion of the work to help cut down on costs.

The ladder modification was completed at budget and within the scheduled time. Most importantly, the customer now had safe access to their roof. If you have a unique situation like this, give us a call. We can help you come up with the solution that fits your site requirements and budget, too.

completed_control_tower_ladder

Stay safe everyone!

We received a sobering message from a customer looking at our caged fixed ladders today:

 “My dad fell off of the roof to his death in June while trying to come down the ladder he had rested on the side of the building.  I believe his foot got caught in the rope.  If he had had one of these ladders this would not have happened.”

Stay safe out there everyone. I know that the above was just a random accident but if there is the chance that you can prevent those, especially after hearing about what can happen, why wouldn’t you?  Taking precautions and doing things the safe and right way may take a little longer or cost a little more, but going home to our loved ones at the end of the day is worth any price.

Our sincere condolences are with this customer and their family and hopefully sharing this story will cause someone else to take a moment to look around and make sure they are taking all necessary safety precautions. If you are unsure if you are doing something right, ask someone.

With a little help we can all make it home safe tonight.

How to properly paint galvanized metal staircases and railings

What is hot dipped galvanized metal and why do people use it?

Before we get into how to paint over galvanized metal, let’s give a really quick background into what hot dipped galvanizing is and why people would do it.
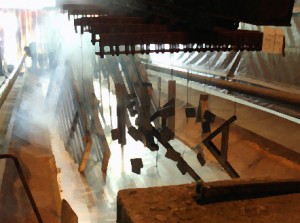
Stair parts being lowered into a bath of molten zinc

Stair parts being lowered into a bath of molten zinc

Hot dipped galvanizing is a process that involves dipping steel into a bath of molten zinc. This process creates a coating that is metallurgically bonded to the steel, in essence becoming the outer layer and part of the steel itself.
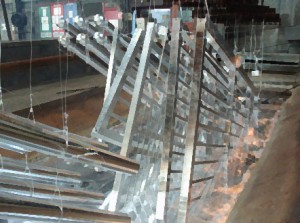
Stair components coming out of the zinc bath

Stair components coming out of the zinc bath

The galvanized coating adheres to the steel at around 3600 psi, where other coatings, like zinc rich painting and zinc plating, adhere to the steel at a rate of 300-600 psi at best. The hot dipped coating has a hardness of between 170-250 DPH (Diamond Pyramid Hardness) as compared to the soft non-abrasion resistant coating of zinc rich paint or a 75 DPH hardness of zinc plating.  This is important as it shows why hot dipped galvanizing is such a popular means of corrosion resistance as opposed to other coating options out there.

How do I paint over hot dipped galvanized steel?

If you are looking for a finish other than the shiny or dull galvanization finishes (there are cosmetic differences between each in luster, but no corrosion difference between the two), you would need to do a duplex, or two part, finish to your product:  a hot dipped galvanized base layer and a painted top layer.

In order to paint galvanized metal you will need to first know whether the steel is:

  • newly galvanized (under 48hrs exposed, no zinc compounds built up on outside of steel),
  • partially weathered (day 2 to one year, some zinc compounds built up on outside of steel as well as possible dirt, grease, dust, etc.)
  • fully weathered (one year on, zinc compounds covering the entire surface.)

If the galvanizing is new you will need to profile the surface to give the paint something to adhere to. You will also need to grind down any bumps or drips that may be present from the galvanizing process as these will show through the paint. REMEMBER: Take care not to grind away the entire galvanized coating; using a hand grinder may be best practice to control pressure and grinding depth. For a partially weathered galvanized surface you will also need to remove any drips or runs, as well as the built up zinc compounds on the surface. For fully weathered surfaces you can skip those steps as the built-up zinc compounds are good for helping the paint adhere.

After you have profiled and/or prepped the surface you will need to clean the oil, dirt and other compounds from the steel. You can wipe down the handrails using a product like “simple green” to ensure there is no oil or other buildup on the material. Then you will need to use clean water to rinse the surface and dry it. Dry time to paint time should be kept to a minimum (under 12 hrs.) in order to avoid allowing any other contamination or build-ups to occur.
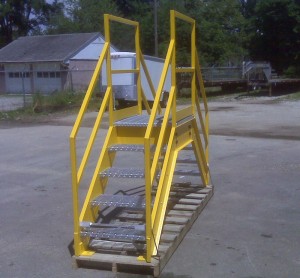
paint galvanized metal stair crossover

Stair crossover with yellow paint over galvanized steel handrails and stringers

What are some paints that are available for use over galvanized steel?

After the surface is clean and profiled you are ready to paint. A primer such as Sherwin Williams “pro-cryl” can be used. This primer dries fast and is corrosion resistant. You can top coat shortly after that with an acrylic coating paint like “DTM”. Check with your local paint supplier for additional options, as well as to get re-coat and cure times based on your temperature, humidity and paint thickness.

 

Secure Elevated Wire Partition Tool Crib

wire_tool_crib_amezz1

By Brett

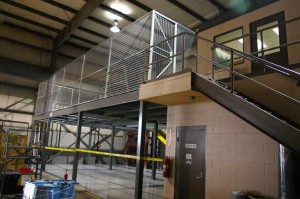
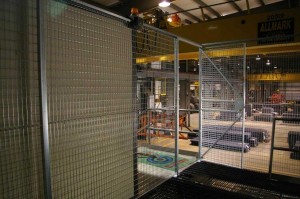
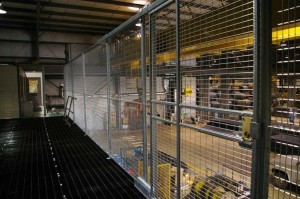
This is a project we completed in NE Ohio. The customer was looking for space for a secure tool crib for maintenance storage as well as the flexibility to store product. As the product was quite heavy, we utilized the ground floor portion for storing those items and used welded galvanized fencing above to secure their maintenance department’s tool storage. The welded wire fencing was selected because of its versatility. Welded wire partition panels have a weld at each intersection of the wire. In contrast, woven wire generally has the individual wires woven and tied off or welded to a fence frame. The welded wire option is great for most jobs because it can be cut to size in the field. If you measure inaccurately, it is not the end of the world because you can trim the extra length off the panels. Likewise, if there is piping or beams running in the way it is easy enough to cut the welded wire fence panel to accommodate the obstruction, while still maintaining the wire partition panel’s integrity.

wire_tool_crib_amezz2We utilized the existing stairs and landing from the building adjacent to the new crib in an effort to cut down cost and avoid taking up more room than necessary on their plant floor. The light you see is a reminder light for the operators of the adjacent crane. It reminds them that the mezzanine and tool crib are there so that they don’t bring their load all the way back to the stop and potentially come in contact with the new structure.

wire_tool_crib_amezz3On the front side of the mezzanine, a sliding door was in place for the occasional pallets of materials for maintenance to offload and store. The customer went with a sliding door because it could be opened, a pallet of material could be set on the top of the mezzanine deck and then the sliding door could be closed while the pallet was offloaded. With a hinged gate they would have needed to pull the pallet away from the opening to close the open fall hazard, but that wasn’t going to be feasible due to the bar grating decking.

wire_tool_crib_amezz4This customer opted for a simple keyed entry on the hinge door, but they could have used a push button or key card lock with electric strike as well.

Ultimately, they were able to have secure storage for their maintenance department while keeping their product storage below, at a price that fit their budget.