Tag Archives: custom fabrications

Custom Crossover Bridge

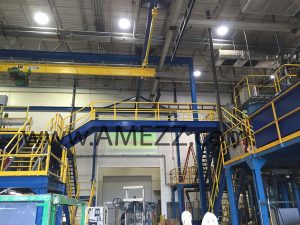
This past year we were called out to a company who had some sprawling equipment. Because of the space required, their employees would be working on the second floor of the left hand mezzanine, and would have to climb down two flights of stairs, cross the forklift aisle, and climb up two more flights of stairs to access the left mezzanine to continue their work. As you can imagine, that was a huge inefficiency.

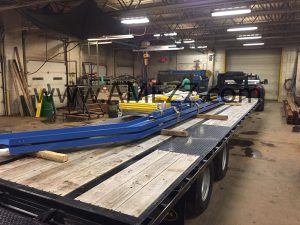
A-Mezz Crossover Platform loaded for delivery to install location

A-Mezz Crossover Bridge loaded for delivery to install location

We designed, fabricated, and installed a crossover bridge to allow them to quickly go from one machine to the next without requiring four flights of stairs to be climbed each time, and it also kept them out of the aisleway between the structures. Due to the elevation change between the two structures, we incorporated a stair at the left hand side of the bridge and fabricated the bridge stringers as one piece to allow it to safely reach each side without requiring any additional supports.


The left side was designed to mount on top of that mezzanine’s edge framing members and at the right we had to add additional steel to allow the crossover bridge to safely and securely attach to the side of the right hand mezzanine.

Installed A-Mezz Custom Crossover Platform

Installed A-Mezz Custom Crossover Bridge


Everything was painted to match their existing equipment. Ultimately, the customer liked the setup so much that they called us back a few months later to do another crossover just like the one we had completed for another location in their factory.  For more information on our custom fabrications please visit our website, email or call. 

Replacing old dock stairs

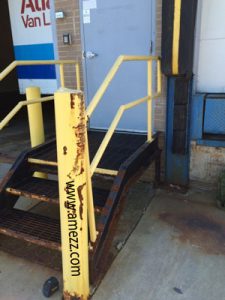
We were recently called out to a site with a dock access stair that had seen better days. It got a lot of use, but by the looks of it, had been neglected from a maintenance standpoint. Enamel paint is a great finish if it is maintained, but when left outside around the salt and high traffic to be found on a dock stair it won’t take long to rust without maintenance.

This stair had the painted stair tread nosings all rusted away to a brittle, porous edge. The stringers and support columns all had given way to rust beyond what was fixable with a repair job.

Dock stairs in need of replacement

Dock stairs in need of replacement

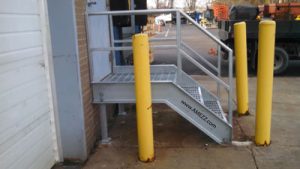
The most economical solution for our customer was to have a replacement set of stairs fabricated and hot dipped galvanized. The cost of repair – cutting the current stairs apart, brush/blasting the existing rust out, cutting steel to weld into deteriorated sections, grinding and painting the product –  all in the field would have taken much more time than having replacement stairs fabricated in the shop and brought out to the site. Furthermore we didn’t want to put a “Band-Aid” on the existing stairs by repairing them, knowing the customer wanted to have something in place to forget about. Fabricating a new stair with a hot dipped galvanized would greatly increase the lifespan of the stairs. There is no touch-up painting required and galvanized products can last 5x as long as painted steel.


A-Mezz did a site visit to verify conditions and get the existing stair’s measurements. During the visit it was determined that the floor wasn’t completely level. We made the support columns slotted to allow for minor adjustment in the field. This will be more user friendly than making the stair flat and requiring shimming. We didn’t want to fabricate each leg a different length should they one day move it to a new location or have the floor surface refinished in the future.


A-Mezz fabricated and pre-assembled as much of the stair and landing as possible in the shop to minimize the time on site with door access out of service as this was a busy dock entrance door. The existing stairs were demo’d and the new stairs were installed in all one morning.

A-Mezz galvanized steel replacement dock stairs

A-Mezz galvanized steel replacement dock stairs

The customer’s new dock stairs will have a long service life due to the hot dipped galvanized finish. The stairs will be able to tackle snow and ice easily with the bar grating treads, and look attractive for years to come – all at a price that was less than repair.

Steel Fixed Ladder Handrail Options

Does my ladder need a handrail?

Almost all ladders will have an extension at the top, with the only exceptions being ladders accessing roof hatches, manholes, floor doors, or anything else that closes over the top of the ladder. If you are exiting the ladder to the side or going to an offset platform due to the 30’ maximum climbing distance between ladders, you will need to add four more rungs above the platform. Those rungs are only to be used for hand-hold only, to give you something to grab onto to safely exit the ladder.
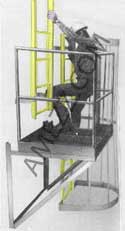
 

Side step ladder platform for climbs over 30' in length

Side step ladder platform for climbs over 30′ in length

If the ladder is going up to a wall, to a roof, or to a mezzanine, then you will need extensions on the ladder for the “walk-through” exit of the ladder.

We have three different designs of walk-through handrails and I’ll go into the details on each of them below.
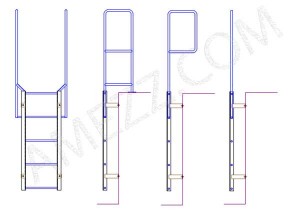
Steel ladder handrail options

Steel ladder handrail options

The first design, the “8” shape, is our standard ladder design. This is the most commonly used handrail setup as it allows for the top of the walk-through to mount to the landing surface, providing the greatest rigidity at the handrail. It also makes installation easy, as there are no questions where the top rung mounts; it is always installed properly meeting the top of the landing surface as required by code.

In cases of short parapets or locations where you cannot have the walk-through handrail anchor to or even set upon the roof you would use the second “P” profile, our “self supported walk-through handrail”. This handrail design works well when there is a parapet under 14” high that the handrail mounting pads would not line up with. It is not a necessity to use the “P” shaped handrail in those instances. Many installers still prefer the “8” layout for the added cross brace back to the ladder. When installing a ladder with our self-supported walk-through handrail, be sure to install properly, with the top rung level with the top of your roof. There is no foot pad at the top to ensure this is done, so installation just requires a check to be sure of compliance.

The last ladder handrail design is our “customer supplied walk-through handrail”. This is used in instances where the installation location has existing railing and handrails that they want to weld the walk-through handrail to. This is useful in locations where space is minimal and existing site conditions allow for field welding to existing rails.

Not shown is our step across platform, which is essentially a crossover used when site conditions require the ladder rung to be more than 12” away from the landing surface as required by OSHA standards. Most commonly, this is used on locations with gutters that are more than 5” off the face of the climbing side of the wall.

OSHA 1910.27(d)(3)

“Ladder extensions.” The side rails of through or side-step ladder extensions shall extend 3 1/2 feet above parapets and landings. For through ladder extensions, the rungs shall be omitted from the extension and shall have not less than 18 nor more than 24 inches clearance between rails. For side-step or offset fixed ladder sections, at landings, the side rails and rungs shall be carried to the next regular rung beyond or above the 3 1/2 feet minimum (fig. D-10).

Ladder Modification to Meet OSHA standards

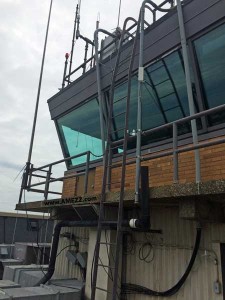
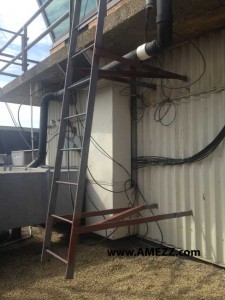
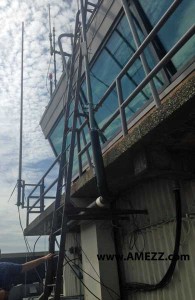
control_tower_ladderWe recently were called out to look at a ladder that did not meet OSHA standards (1910.27) for clearance on the back side of the ladder. The ladder also had two angles of climb as shown in the above photo. When climbing up the ladder, the concrete walk was too close to the ladder for you to safely grasp the rung and also to put your foot on the rung while climbing. The ladder was accessing the top of the traffic control tower at an airport, and as such, we had to work around a variety of factors to ensure a proper replacement or modification of the ladder could take place without interrupting operations. As the install location was at an airport, the use of a crane to bring a replacement ladder to location would have been a logistical nightmare. We decided that whatever the solution was, it was to be brought up from the inside of the tower.
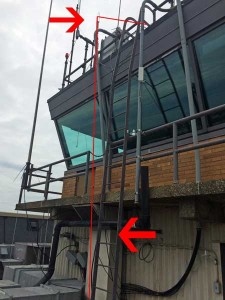
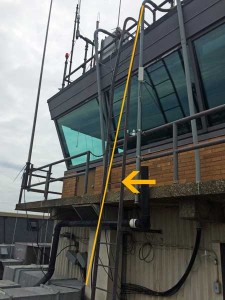
control_tower_ladder_option1Our first option was to remove the ladder and replace it with a 90 degree ladder. That is the most common fixed ladder type. There were, however, issues with supplying a replacement ladder.  First off, the concrete walk and rail were extended beyond the top of the tower. This meant that our replacement ladder would need to be very far from the structure in order to give us the required 7” clearance behind the ladder at the concrete walk location. That is not a deal breaker, but holding so far off the structure would have also required an extra-long crossover to reach the tower roof.  OSHA allows the ladder to have a maximum 12” step across at the top of the ladder. As the ladder has to stand 7” off of the wall (or the furthest obstruction off the wall) you can get by without a step across platform if the obstruction is 5” or under (5+7=12). The replacement ladder would have been very large. Ordinarily, this too can be dealt with by using our modular line. Our Modular Fixed Ladders come in pieces no larger than 7’L. Each ladder section bolts to the next one and has a pair of standoff brackets before and after the splice.

We could not accommodate additional standoff brackets required by the modular design so we would have needed to weld each splice together. Again, this was not a deal breaker either, but it did make this option less economical than other options.

control_tower_ladder_option2We decided that it was more economical to modify the existing ladder. The top of the ladder was already angled at an 81 degree angle. In the field we ran a laser down the ladder from the top to see where we would land if we kept that same angle throughout the climbing run. By cutting the ladder at the bend, and then cutting each of the lower standoff brackets, we were able to gain close to a foot of clearance at the concrete landing, well within the acceptable tolerances of OSHA’s standards. This option was not without its challenges though. As the ladder was going to be sticking off the wall even further than before, we were concerned about having a stable climb.

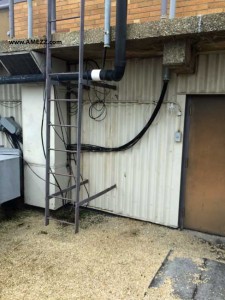
Here is the original ladder with the standoff brackets back to the structure.

Here is the original ladder with the standoff brackets back to the structure.

control_tower_ladder_afterWe added cross bracing across the two standoff brackets to stiffen the ladder up with the extended bracket length. After modifying the ladder, the bottom rung was still within the 14” allowed by ANSI A14.3, so no additional ladder rungs were required. Each welded location was then sanded down to remove any sharp edges or burrs and painted with a rust inhibiting primer. The end user was going to have their maintenance department repaint the ladder after completion of the work to help cut down on costs.

The ladder modification was completed at budget and within the scheduled time. Most importantly, the customer now had safe access to their roof. If you have a unique situation like this, give us a call. We can help you come up with the solution that fits your site requirements and budget, too.

completed_control_tower_ladder