Author Archives: A-Mezz

OSHA Changes Ladder Fall Protection Requirements (OSHA 1910.28)

OSHA is on fire! Breaking news! WOW!

Ok now that we’ve got that out of our system… We don’t usually have many changes out there when it comes to OSHA standards but there are some industry changing updates coming that will change a lot of things.

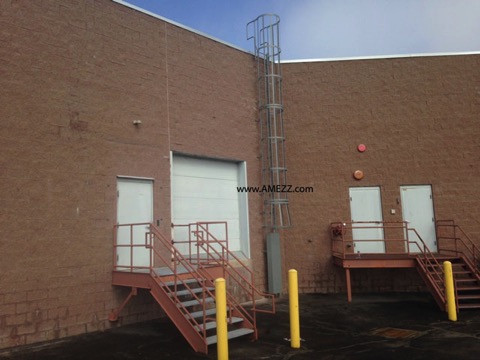
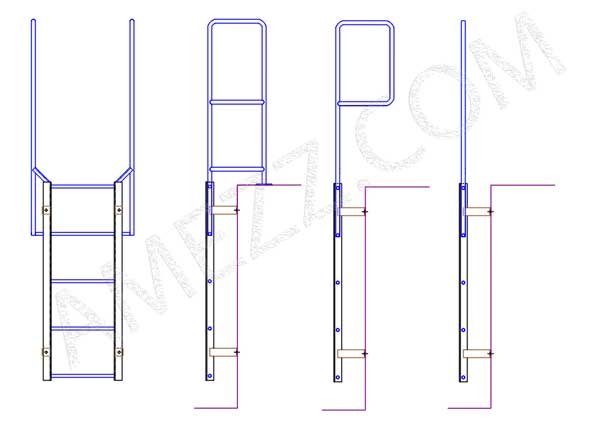
Cages will not be required on fixed ladders after mid November of 2018.

Caged ladders to be phased out for other fall protection options

Caged ladders to be phased out for other fall protection options in 2018

Currently, under OSHA standard 1910.27 cages are required on ladders where the climbs are over 20’h. In OSHA’s new standard (OSHA standard 1910.28) taking effect 11/19/2018, ladders will not be required to have fall protection until their height is over 24’ (24’-0-1/4” requires fall protection). OSHA will also be requiring ladders installed after 11/18/2018 to have fall protection in the form of a personal fall arrest system or ladder safety system (not a cage). If you have cages now, don’t worry, you will be grandfathered in for twenty years.

So, why the change? OSHA is aligning the fixed ladder standard to be more in line with the ANSI standard A14.3, which in 1979 changed its fall protection height requirement from 20’ to 24’.

Why are they telling us now when the rule won’t go into effect until 11/19/2018? OSHA wants to give the industry time to update products and procedures before they go fine crazy. You CAN now follow the new OSHA rule 1910.28 even though it is not in effect yet. You would not be meeting the current OSHA standard, but you would be in compliance with the future OSHA standard. OSHA would consider this a “de minimis violation”. De minimis violations are violations of standards which have no direct or immediate relationship to safety or health, and do not result in a citation, or penalty and need not be abated. 

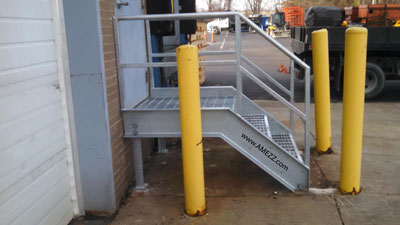
How does this help you? Well, if your floor to floor height is between 20’ and 24’, you will no longer need to have a cage on your ladder. First off, this can save you LOTS of money. Why?  Not only is it easier to fabricate an uncaged ladder, but there is less steel involved in making the ladder, and also, due to the size a caged ladder takes up on a truck compared to an uncaged ladder, caged ladders can cost 2-4 times as much to ship than their uncaged counterparts.  Another advantage of losing the cage is that you decrease its visibility from the roadside. Without the large cage the ladder is tougher to see from a distance, increasing your buildings visual appeal as well as decreasing the chance that kids looking for a cool place to skateboard, copper thieves, and other people you don’t want on your roof will see the ladder as they pass.

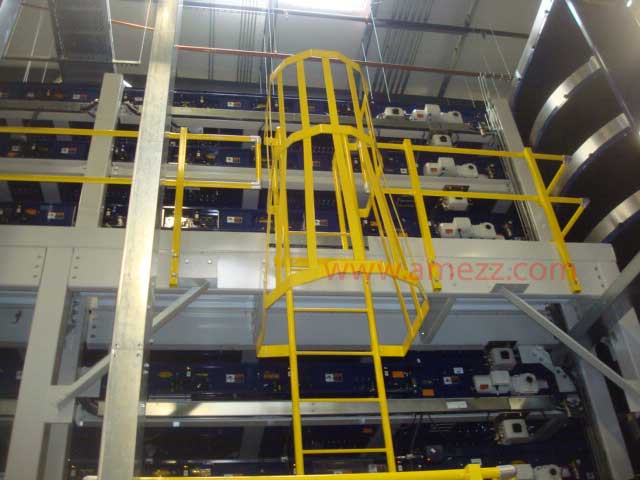
All this being said, when OSHA’s standard mandated cages on climbs over 20’, A-Mezz still offered cages on ladders that only had a climb of 10’ or so and we will continue to offer cages for customers who prefer the added safety of a cage for those shorter climbs. We have gotten feedback from many customers who prefer having a ladder cage because that safety barrier is always in place. You can’t forget to bring a harness with a cage so safety is increased. It is the same argument that makes ladder safety gates so popular and efficient as opposed to ladder chains. Chains only work if the person before you closed them. Ladder safety gates are always in place, always swing closed and always protect you. The same goes for a fixed ladder cage which adds some protection for climbers regardless of whether they have a ladder harness or not.

Replacing old dock stairs

We were recently called out to a site with a dock access stair that had seen better days. It got a lot of use, but by the looks of it, had been neglected from a maintenance standpoint. Enamel paint is a great finish if it is maintained, but when left outside around the salt and high traffic to be found on a dock stair it won’t take long to rust without maintenance.

This stair had the painted stair tread nosings all rusted away to a brittle, porous edge. The stringers and support columns all had given way to rust beyond what was fixable with a repair job.

Dock stairs in need of replacement

Dock stairs in need of replacement

The most economical solution for our customer was to have a replacement set of stairs fabricated and hot dipped galvanized. The cost of repair – cutting the current stairs apart, brush/blasting the existing rust out, cutting steel to weld into deteriorated sections, grinding and painting the product –  all in the field would have taken much more time than having replacement stairs fabricated in the shop and brought out to the site. Furthermore we didn’t want to put a “Band-Aid” on the existing stairs by repairing them, knowing the customer wanted to have something in place to forget about. Fabricating a new stair with a hot dipped galvanized would greatly increase the lifespan of the stairs. There is no touch-up painting required and galvanized products can last 5x as long as painted steel.


A-Mezz did a site visit to verify conditions and get the existing stair’s measurements. During the visit it was determined that the floor wasn’t completely level. We made the support columns slotted to allow for minor adjustment in the field. This will be more user friendly than making the stair flat and requiring shimming. We didn’t want to fabricate each leg a different length should they one day move it to a new location or have the floor surface refinished in the future.


A-Mezz fabricated and pre-assembled as much of the stair and landing as possible in the shop to minimize the time on site with door access out of service as this was a busy dock entrance door. The existing stairs were demo’d and the new stairs were installed in all one morning.

A-Mezz galvanized steel replacement dock stairs

A-Mezz galvanized steel replacement dock stairs

The customer’s new dock stairs will have a long service life due to the hot dipped galvanized finish. The stairs will be able to tackle snow and ice easily with the bar grating treads, and look attractive for years to come – all at a price that was less than repair.

Fixed Ladder Installation – the process from start to finish

A customer called asking for a safe and secure means of accessing their roof and us to do a fixed ladder installation. They have a building that has multiple tenants and didn’t want to have to go through the tenants’ space every time roof access was needed, so an interior ladder and roof hatch combination was off the table. This happens more often than not either because they don’t have a good location inside to mount the ladder or they don’t want to make a hole in their roof.

We went out for a preliminary site visit to verify what the job would entail. The location that was chosen to mount that ladder at was flat from floor to roof. There were no gutters so we would not have to worry about having to either start and stop the gutter and add another down spout, or add a step across platform at the top of the ladder to keep within OSHA’s requirement of a maximum step across a distance of 12”.

Installation site for caged ladder

Installation site for caged ladder

There was a slight parapet at the top of the wall so we set up the extension ladders to verify that the parapet was under 14”high so we would not need to have a crossover ladder with return on the back. We did elect to modify the walk through handrail to remove the return down to the roof to allow more flexibility with installation. Using the self supported walk through handrail allowed a proper fit regardless of the parapet thickness.

Materials were fabricated and shipped to the jobsite where the installation crew attached the lower and upper ladder sections together with the supplied brackets. Next, the ladder was hooked up and elevated into place by a forklift boom. By securing the ladder a little lower than the top, but well past the weight ½ way point, we were able to safely use a shorter, readily available lift and avoid the added cost of additional machine rental.

Lifting the fixed ladder into position

Lifting the fixed ladder into position

The ladder was also outfitted with the LG6 6’ security ladder rung guard to prevent unauthorized access to the ladder. Once hoisted into place, ½” sleeve anchors were inserted into holes drilled into the block and turned until expanded properly, securing the ladder to the wall. For this ladder 18 anchors were used, distributing the 650# ladder and 300# capacity load to well below the tension and shear values for sleeve anchors with the recommended 1-7/8” minimum embedment and a 4:1 (25%) safety factor. Installation was completed in just one morning by a crew of two.

Completed installation of fixed ladder

Completed fixed ladder installation

Replace stairs in tight fit locations and meet code

Many locations have old stairs that need to fixed or replaced due to age, damage etc. Generally speaking regardless of the code in place when the original stair was made, you will need to update your stair to the current building code (IBC) when you replace stairs.

OSHA staircase, replace stairs

Stair meeting OSHA standards

3404.1 General. Except as provided by Section 3401.4 or this section, alterations to any building or structure shall comply with the requirements of the code for new construction. Alterations shall be such that the existing building or structure is no less complying with the provisions of this code than the existing building or structure was prior to the alteration.

This becomes an issue when stairs are installed in tight locations under codes that vary greatly from today’s current International Building Code (IBC) variants.

Imagine having a 12’ high stair in place with a riser height of 9” and a tread depth of 9”. This stair would have (16) treads, 9”deep for a total run of 11’3”.

If the replacement stairs would be required to meet IBC code (adopted by all of the states) they would now need to have (20) treads, 11” deep for a total run of 18’4”. The IBC stairs would extend 7’1” further than the originally installed stairs.

The increased run and decreased slope can wreak havoc on your facilities if the original stairs stopped right before a hallway (new stairs would extend well into the hallway) or if the stairs are enclosed (new slope would cause head clearance issues with existing structure).

If the above situation applies to you don’t sweat it. The above referenced IBC code section does have an exception that may help

Exceptions:

  1. An existing stairway shall not be required to comply with the requirements of Section 1009 where the existing space and construction does not allow a reduction in pitch or slope.
  2. Handrails otherwise required to comply with Section 1009.12 shall not be required to comply with the requirements of Section 1012.6 regarding full extension of the handrails where such extensions would be hazardous due to plan configuration.


Why the exemption for stairs (and possibly ramps, though not specifically called out)? The thinking behind the exemption is that without it, stairs that need to be replaced and are not safe will be neglected and not maintained due to the inability to bring them up to current codes. It is better to have a well maintained stair meeting an earlier code than have a poorly maintained stair that doesn’t meet current codes.

Steel Fixed Ladder Handrail Options

Does my ladder need a handrail?

Almost all ladders will have an extension at the top, with the only exceptions being ladders accessing roof hatches, manholes, floor doors, or anything else that closes over the top of the ladder. If you are exiting the ladder to the side or going to an offset platform due to the 30’ maximum climbing distance between ladders, you will need to add four more rungs above the platform. Those rungs are only to be used for hand-hold only, to give you something to grab onto to safely exit the ladder.


Side step ladder platform for climbs over 30' in length

Side step ladder platform for climbs over 30′ in length

If the ladder is going up to a wall, to a roof, or to a mezzanine, then you will need extensions on the ladder for the “walk-through” exit of the ladder.

We have three different designs of walk-through handrails and I’ll go into the details on each of them below.

Steel ladder handrail options

Steel ladder handrail options

The first design, the “8” shape, is our standard ladder design. This is the most commonly used handrail setup as it allows for the top of the walk-through to mount to the landing surface, providing the greatest rigidity at the handrail. It also makes installation easy, as there are no questions where the top rung mounts; it is always installed properly meeting the top of the landing surface as required by code.

In cases of short parapets or locations where you cannot have the walk-through handrail anchor to or even set upon the roof you would use the second “P” profile, our “self supported walk-through handrail”. This handrail design works well when there is a parapet under 14” high that the handrail mounting pads would not line up with. It is not a necessity to use the “P” shaped handrail in those instances. Many installers still prefer the “8” layout for the added cross brace back to the ladder. When installing a ladder with our self-supported walk-through handrail, be sure to install properly, with the top rung level with the top of your roof. There is no foot pad at the top to ensure this is done, so installation just requires a check to be sure of compliance.

The last ladder handrail design is our “customer supplied walk-through handrail”. This is used in instances where the installation location has existing railing and handrails that they want to weld the walk-through handrail to. This is useful in locations where space is minimal and existing site conditions allow for field welding to existing rails.

Not shown is our step across platform, which is essentially a crossover used when site conditions require the ladder rung to be more than 12” away from the landing surface as required by OSHA standards. Most commonly, this is used on locations with gutters that are more than 5” off the face of the climbing side of the wall.

OSHA 1910.27(d)(3)

“Ladder extensions.” The side rails of through or side-step ladder extensions shall extend 3 1/2 feet above parapets and landings. For through ladder extensions, the rungs shall be omitted from the extension and shall have not less than 18 nor more than 24 inches clearance between rails. For side-step or offset fixed ladder sections, at landings, the side rails and rungs shall be carried to the next regular rung beyond or above the 3 1/2 feet minimum (fig. D-10).

Stair tread adhesives

By Jared @ Floormatstore.com

Winter is coming… and it’s time to shift from tackling outdoor projects to indoor ones. At the floormat-store.com division, that tends to mean a spike in stair tread inquiries. Installing indoor rubber and vinyl stair treads is a great cold weather project. What most customers forget to consider when attempting a stair tread project when it gets cold though, is the adhesive.


Rubber and vinyl flooring adhesives have minimum temperatures usually around 65°F. If the temperature of the room you’re installing in isn’t at or above the minimum, you’ll be waiting a long time for the adhesive to set. Every year, we get a few customers calling with the complaint that the adhesive they received was a bad batch. So far, every time, it wasn’t the adhesive’s fault. The installer failed to read the instructions thoroughly enough to catch that temperature warning. Usually, it’s an unfinished basement or the few steps that lead from the garage to the house, but with the kids out of school over Thanksgiving and winter break, cold stair wells in schools are a common application, too. Most adhesives also need around 24 hours to set in ideal situations, so leave that heat on for a day (or two) after you finish.


Musson #300 water based contact adhesive

Musson #300 water based contact adhesive with 0 VOCs. Great for indoor stair tread installations

While keeping the temperature in mind, you’ll also want to consider that a lot of adhesive options require a well ventilated area. In summer that’s easy – just open some windows and doors and wear a mask. As it gets cold outside though, leaving those open isn’t an option. So make sure to get a low VOC adhesive that will work for the application. The last thing you want is to pass out from the fumes while installing stair treads – ouch! A water-based contact adhesive, like Musson’s #300, works for both rubber and vinyl treads, risers and tiles, going over concrete, wood, terrazzo, metal and marble – and typically have 0 VOCs. That safely covers just about any application.


Best of luck and stay safe with your projects.

-Jared @ www.floormatstore.com

Ladder Modification to Meet OSHA standards

control_tower_ladder
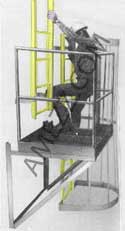
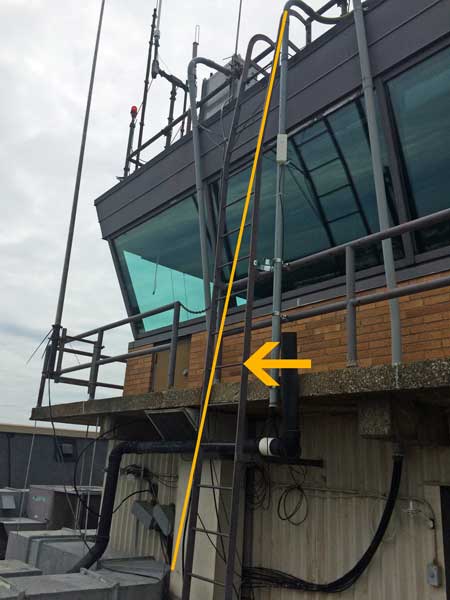
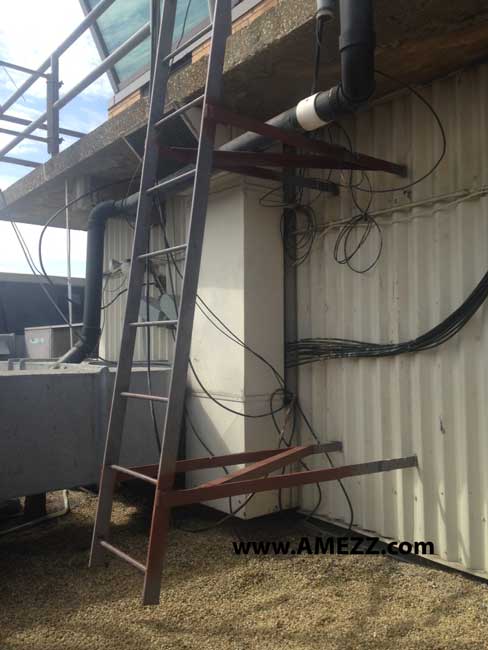
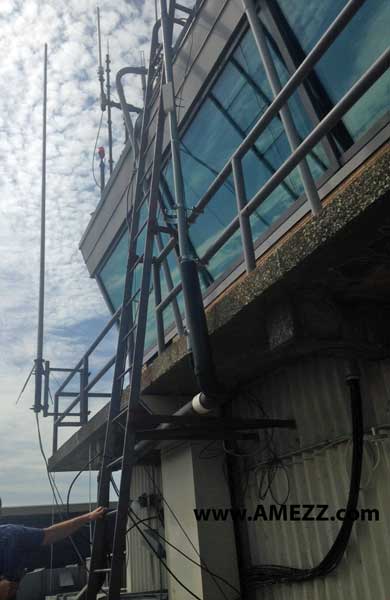
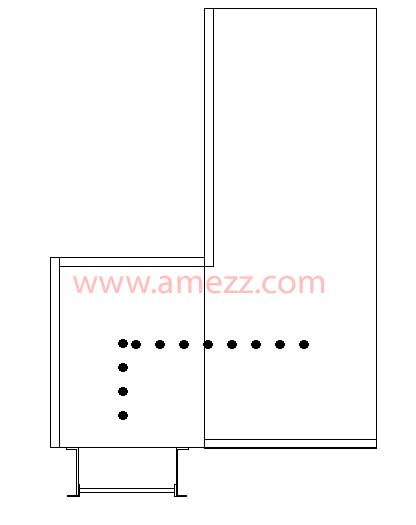
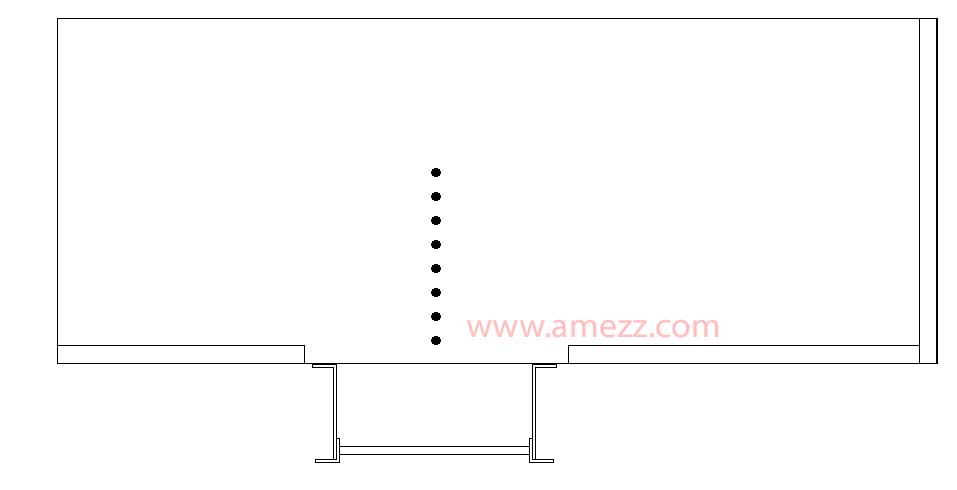
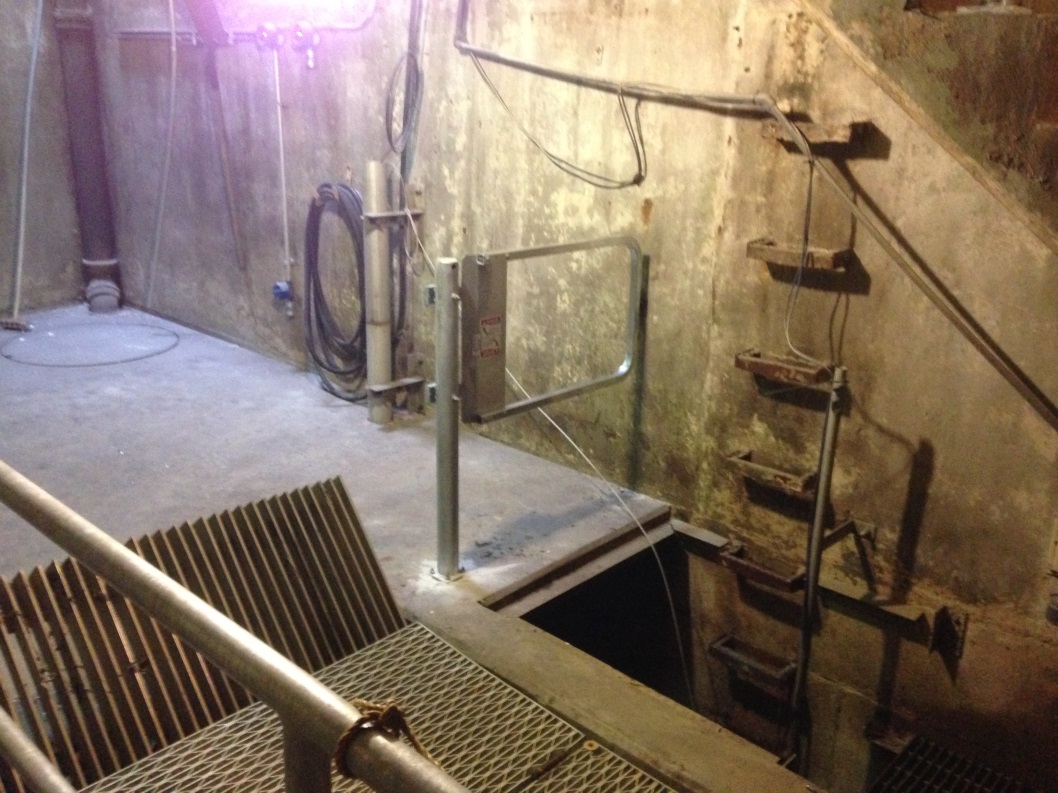
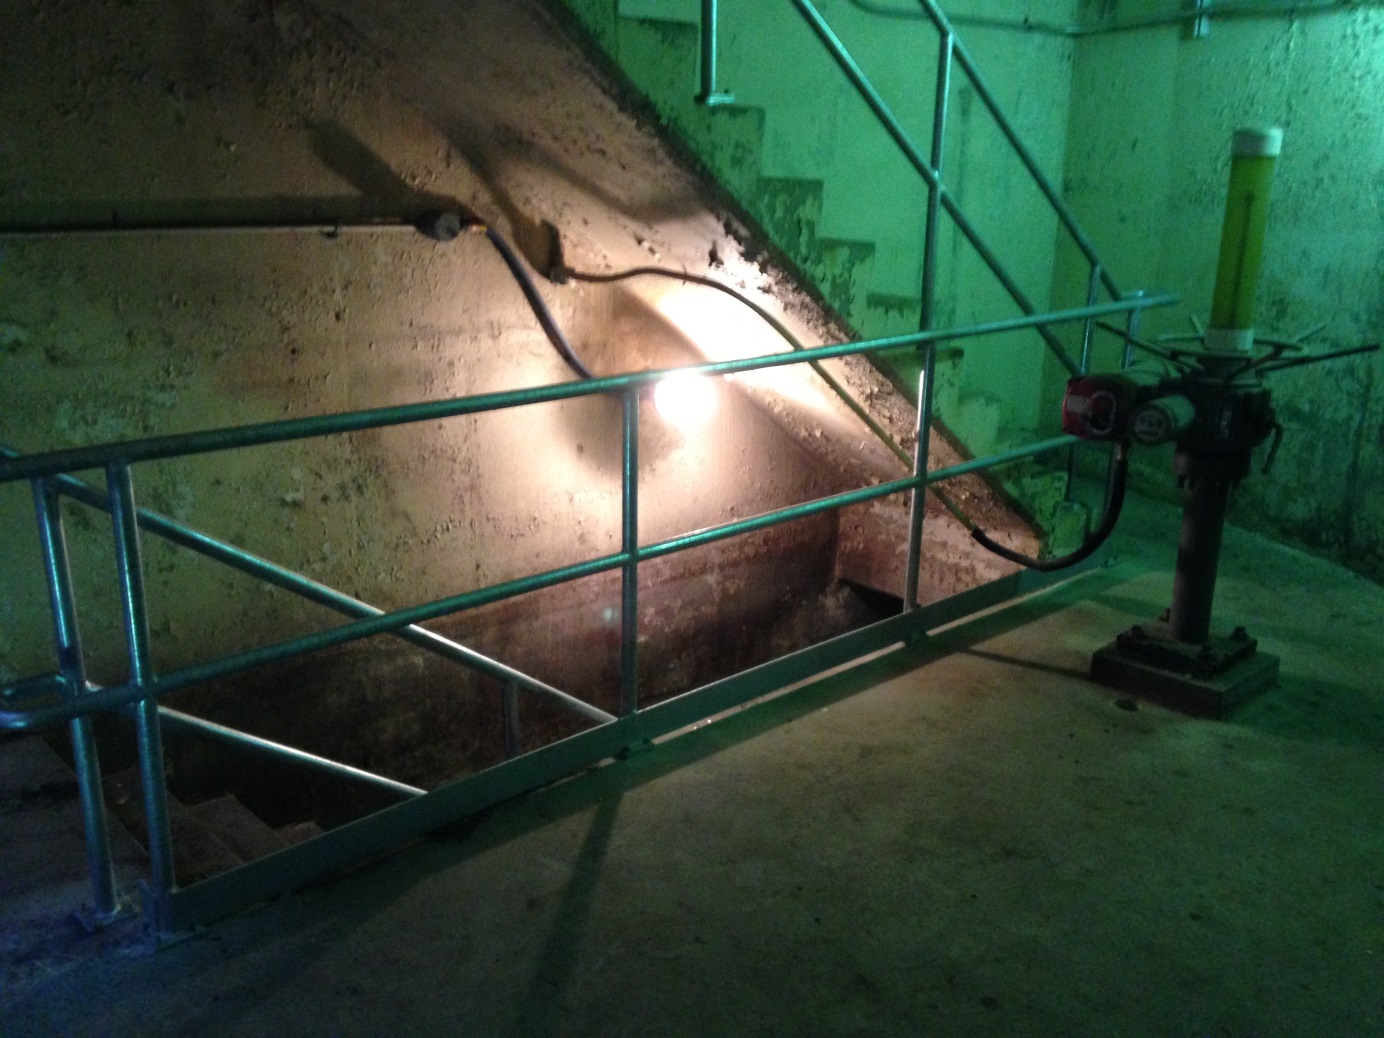
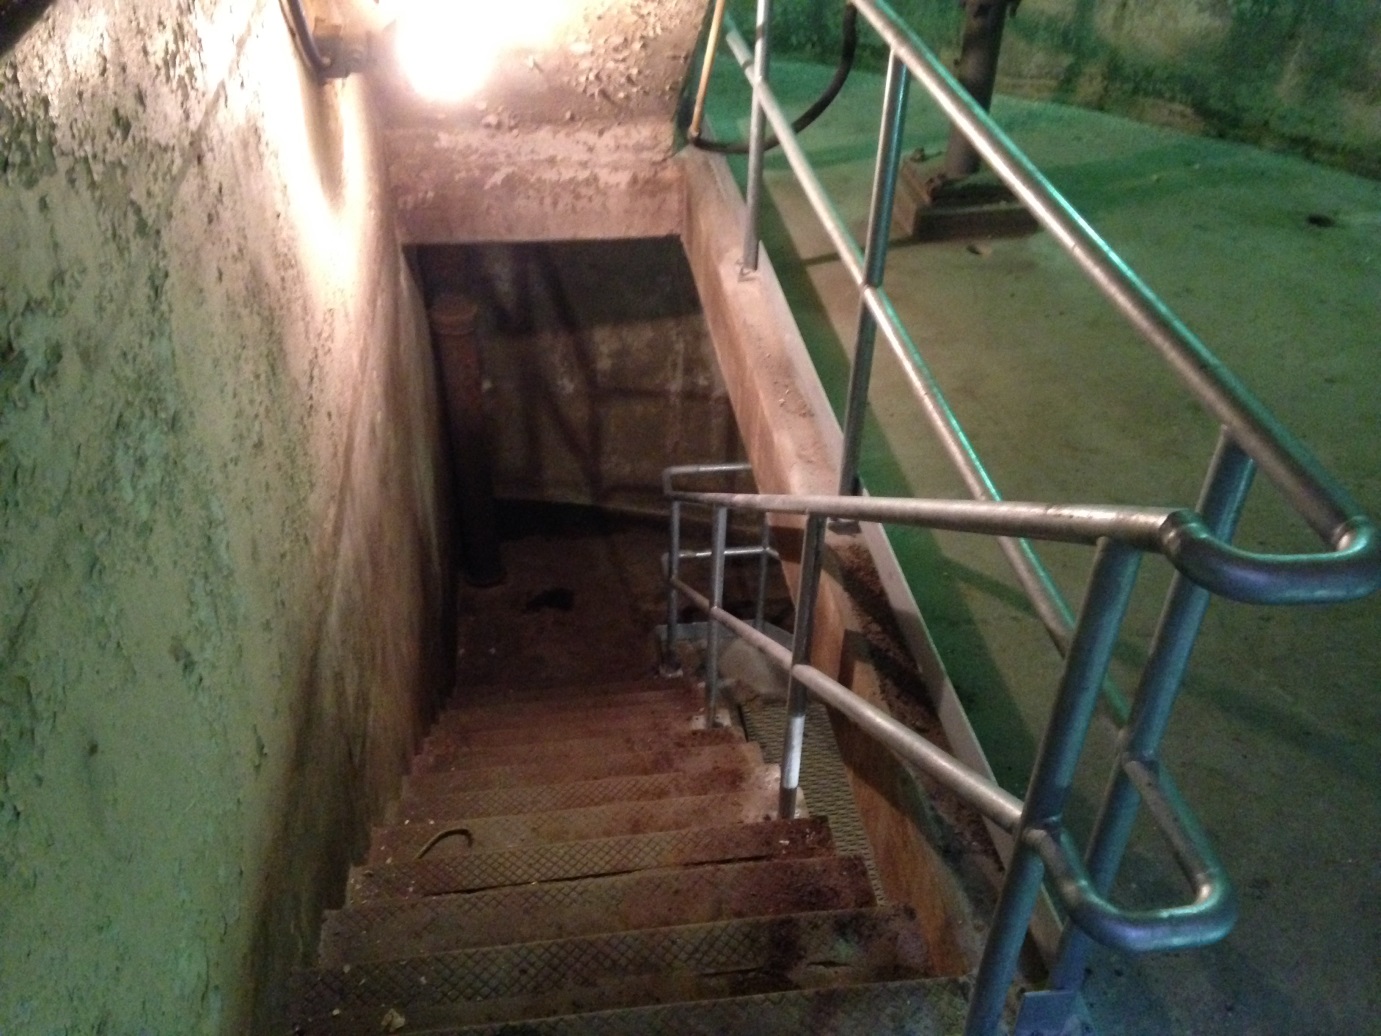
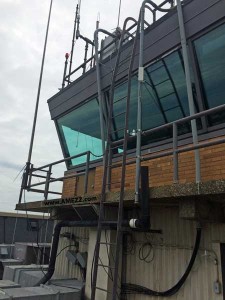
We recently were called out to look at a ladder that did not meet OSHA standards (1910.27) for clearance on the back side of the ladder. The ladder also had two angles of climb as shown in the above photo. When climbing up the ladder, the concrete walk was too close to the ladder for you to safely grasp the rung and also to put your foot on the rung while climbing. The ladder was accessing the top of the traffic control tower at an airport, and as such, we had to work around a variety of factors to ensure a proper replacement or modification of the ladder could take place without interrupting operations. As the install location was at an airport, the use of a crane to bring a replacement ladder to location would have been a logistical nightmare. We decided that whatever the solution was, it was to be brought up from the inside of the tower.

control_tower_ladder_option1Our first option was to remove the ladder and replace it with a 90 degree ladder. That is the most common fixed ladder type. There were, however, issues with supplying a replacement ladder.  First off, the concrete walk and rail were extended beyond the top of the tower. This meant that our replacement ladder would need to be very far from the structure in order to give us the required 7” clearance behind the ladder at the concrete walk location. That is not a deal breaker, but holding so far off the structure would have also required an extra-long crossover to reach the tower roof.  OSHA allows the ladder to have a maximum 12” step across at the top of the ladder. As the ladder has to stand 7” off of the wall (or the furthest obstruction off the wall) you can get by without a step across platform if the obstruction is 5” or under (5+7=12). The replacement ladder would have been very large. Ordinarily, this too can be dealt with by using our modular line. Our Modular Fixed Ladders come in pieces no larger than 7’L. Each ladder section bolts to the next one and has a pair of standoff brackets before and after the splice.

We could not accommodate additional standoff brackets required by the modular design so we would have needed to weld each splice together. Again, this was not a deal breaker either, but it did make this option less economical than other options.

control_tower_ladder_option2We decided that it was more economical to modify the existing ladder. The top of the ladder was already angled at an 81 degree angle. In the field we ran a laser down the ladder from the top to see where we would land if we kept that same angle throughout the climbing run. By cutting the ladder at the bend, and then cutting each of the lower standoff brackets, we were able to gain close to a foot of clearance at the concrete landing, well within the acceptable tolerances of OSHA’s standards. This option was not without its challenges though. As the ladder was going to be sticking off the wall even further than before, we were concerned about having a stable climb.

Here is the original ladder with the standoff brackets back to the structure.

Here is the original ladder with the standoff brackets back to the structure.

control_tower_ladder_afterWe added cross bracing across the two standoff brackets to stiffen the ladder up with the extended bracket length. After modifying the ladder, the bottom rung was still within the 14” allowed by ANSI A14.3, so no additional ladder rungs were required. Each welded location was then sanded down to remove any sharp edges or burrs and painted with a rust inhibiting primer. The end user was going to have their maintenance department repaint the ladder after completion of the work to help cut down on costs.

The ladder modification was completed at budget and within the scheduled time. Most importantly, the customer now had safe access to their roof. If you have a unique situation like this, give us a call. We can help you come up with the solution that fits your site requirements and budget, too.

completed_control_tower_ladder

Do I Need a Swing Gate on My Fixed Ladder?


Walk-thru fixed ladder with cage

Walk-thru fixed ladder with safety cage

Do you need a ladder gate at your ladder opening in your railing? According to OSHA 1910.28(b)(3)(iv)“Each employee is protected from falling into a ladderway floor hole or ladderway platform hole by a guardrail system and toeboards erected on all exposed sides, except at the entrance to the hole, where a self-closing gate or an offset must be used.”

This means that every ladder opening needs to be either (a) Offset so that a person cannot walk (or fall) directly into the opening or (b) Protected by a ladder safety gate. It is an easy either/or. The most common ladder installation locations are not offset and as such require safety gates. Below you will see some photos of ladders and top view sketches clarifying why each of their orientations either do or do not require a gate. Note: ladder chains do not meet OSHA standards.

Another seemingly redundant standard from OSHA further increases the areas requiring gates is 1910.29(b)(13) and 1910.29(b)(13)(i): When guardrail systems are used around holes that serve as points of access (such as ladderways), the guardrail system opening: (1910.29(b)(13)(i) has a self closing gate that slides or swings away from the hole, and is equipped with a top rail and midrail or equivalent intermediate member(…). 

This standard opens up gate requirements to manhole covers, roof hatches and other similar systems that would remain open while accessed.

Now that we know what the code requirement is, it is time to review a few common ladder mounting orientations to discuss where they fall under the code.

Fixed ladder mounted to side of platform

Fixed ladder mounted to side of platform

The above fixed ladder is mounted onto the side of the platform. Work is performed further down the platform but it is possible to fall directly down the ladder opening. This location is not offset and as such would require a swing gate. See the below top view sketch for clarification.

Top view sketch of side mounted fixed ladderway opening

Top view sketch of side mounted fixed ladderway opening

You can walk directly to the ladder opening from where work is/can be expected to be performed and as such, a safety gate is required at the ladder opening.

Fixed ladder with offset landing platform

Fixed ladder with offset landing platform

The above ladder accesses a platform and then turns to access the main walkway. This ladder is offset and would not require a swing gate at the opening.

Top view sketch of offset mounted fixed ladderway opening

Top view sketch of offset mounted fixed ladderway opening

As you can see above, if someone fell while at the main walkway they would fall onto the ladder landing surface, they would not fall down the ladder opening. If the ladder was rotated to the left side of the landing it would require a safety gate because then the ladder opening would no longer be offset.

Ladderway opening on side of catwalk

Ladderway opening on side of catwalk

Above is a very common ladder mount position. This one can be tricky until you lay it out from the top view. From first glance it looks like because the ladder is off to the side that it would be offset from the normal flow of traffic, but if you fell at that point of the catwalk there would be no guarding to protect you. A swing gate is a requirement at this location.

Top view sketch of catwalk side mounted fixed ladderway opening

Top view sketch of catwalk side mounted fixed ladderway opening

As you can see from the above sketch, there is a single direction of travel to the ladder from the catwalk. This is not offset. It would be a single direction fall into the ladder opening and as such, a ladder safety gate is required to protect your employees when a ladder is installed in the above orientation.

Most areas are not offset. A good rule of thumb is that if you can fall into the ladder opening with a single direction fall, then you are not offset. The only example above that didn’t need a gate was the second ladder location. With that orientation, you would fall onto the ladder landing and then hit the rear railing, not fall through the ladder opening.

Stay safe everyone!

We received a sobering message from a customer looking at our caged fixed ladders today:

 “My dad fell off of the roof to his death in June while trying to come down the ladder he had rested on the side of the building.  I believe his foot got caught in the rope.  If he had had one of these ladders this would not have happened.”

Stay safe out there everyone. I know that the above was just a random accident but if there is the chance that you can prevent those, especially after hearing about what can happen, why wouldn’t you?  Taking precautions and doing things the safe and right way may take a little longer or cost a little more, but going home to our loved ones at the end of the day is worth any price.

Our sincere condolences are with this customer and their family and hopefully sharing this story will cause someone else to take a moment to look around and make sure they are taking all necessary safety precautions. If you are unsure if you are doing something right, ask someone.

With a little help we can all make it home safe tonight.

Replacement Stair Rails

We recently were called out to a site with a corrosive environment that was in need of replacement stair rails as all of the original handrails were rusting and in disrepair. The paint was almost all chipped up, and some areas of the handrails were so corroded you had to choose between risking a fall by not grabbing the stair handrails, and grabbing the handrails but risking the need for a tetanus shot.

Existing railings corroded from damp environment

Existing railings corroded from damp environment

The above picture shows the lowest section with a bollard and chain assembly “protecting” the pit ladder that is bent, corroded and weakened at the base. It also doesn’t meet OSHA standards for rail heights or strength at top rail. You can also see the rusted handrail and stair rail. Anytime you have a damp environment it’s best to use a material besides carbon steel – Galvanized steel, aluminum or stainless steel all perform much better over time. Remember that corrosion doesn’t just make the metals look bad, but it also weakens them, substantially lessening their lifetime usability. Sure, the other metal options cost more than plain carbon steel, but when you have to replace the material before its time you have to pay for demo of the inferior material, fabrication of the new material, installation of the new material and have the lost time from the job being out of service during that process.


New hot dipped galvanized replacement stair rails and safety gate

New replacement hot dipped galvanized railings and safety gate

Here is the same view after we finished. We removed the bollard and replaced it with one with a more sturdy post and baseplate. The chains were removed and replaced with our MLG Ladder Safety Gate with a hot dipped galvanized finish. The new set-up is going to stand up to the moist, caustic environment much better and easily meets OSHA standards for guarding at a ladderway opening.

29 CFR 1910.23 Guarding of floor and wall openings and holes. “(a)(2) Every ladderway floor opening or platform shall be guarded by a standard railing with standard toe board on all exposed sides (except at entrance to opening), with passage through the railing either provided with a swing gate or so offset that a person cannot walk directly into the opening.”

New rails with OSHA required toe guard to prevent items from falling over the edge

New rails with OSHA required toe guard to prevent items from falling over the edge

All of the new handrails were done to OSHA standards with a 4” toe kick at the bottom, a 21” mid rail and a 42” top rail. Along the stairs, the stair rails were 34” high from the edge of the nosing. There was no wall mounted rail as the stair width is less than 44” wide and there is only one open side.

29 CFR 1910.23 (d) Stairway railings and guards. “(1)(ii) On stairways less than 44 inches wide having one side open, at least one stair railing on open side.”


Smooth, continuous handrail to maintain contact with rail throughout the climb

Smooth, continuous handrail to maintain contact with rail throughout the climb

The replacement stair rails are designed for a seamless transition between flights, allowing someone to slide their hand from the top rail to the bottom of the stairs without letting go of the rail. This gives a nice, clean look and also allows for safer access and increased strength of rails. Added strength also comes from the baseplate design with a four bolt pattern to maximize rail strength and minimize movement regardless of where pressure is applied front, back, top etc.

There were some unique challenges to this project with the winding rails, but with proper site dimensions and knowing the details about the installation environment, it was quite easy to supply this customer with replacement rails that fit and will last them a lot longer than their previous set.